
Writer 6.0 Guide
Chapter 14
Mail Merge
Form Letters, Mailing Labels, and Envelopes

Copyright
This document is Copyright © 2018 by the LibreOffice Documentation Team. Contributors are listed
below. You may distribute it and/or modify it under the terms of either the GNU General Public
License (http://www.gnu.org/licenses/gpl.html), version 3 or later, or the Creative Commons
Attribution License (http://creativecommons.org/licenses/by/4.0/), version 4.0 or later.
All trademarks within this guide belong to their legitimate owners.
Contributors
Jean Hollis Weber Bruce Byfield Gillian Pollack
Acknowledgments
This chapter is updated from previous versions of the LibreOffice Writer Guide. Contributors to
earlier versions are:
Jean Hollis Weber John A Smith Ron Faile Jr.
An earlier version appeared in the OpenOffice 3.3 Writer Guide. The contributors were:
Agnes Belzunce Dick Detwiler Peter Hillier-Brook
Peter Kupfer Alan Madden Iain Roberts
Barbara M. Tobias Jean Hollis Weber Michele Zarri
Feedback
Please direct any comments or suggestions about this document to the Documentation Team’s
mailing list: [email protected]
Note
Everything you send to a mailing list, including your email address and any other
personal information that is written in the message, is publicly archived and cannot be
deleted.
Publication date and software version
Published July 2018. Based on LibreOffice 6.0.
Note for macOS users
Some keystrokes and menu items are different on macOS from those used in Windows and Linux.
The table below gives some common substitutions for the instructions in this book. For a more
detailed list, see the application Help.
Windows or Linux macOS equivalent Effect
Tools > Options
menu selection
LibreOffice > Preferences Access setup options
Right-click Control+click and/or right-click
depending on computer setup
Open a context menu
Ctrl (Control) ( Command) Used with other keys
F5 Shift+ + F5 Open the Navigator
F11 + T Open the sidebar Styles and Formatting deck
Documentation for LibreOffice is available at http://documentation.libreoffice.org/en/

Contents
Copyright..............................................................................................................................2
Contributors.................................................................................................................................2
Acknowledgments........................................................................................................................ 2
Feedback.....................................................................................................................................2
Publication date and software version.........................................................................................2
Note for macOS users................................................................................................................. 2
What is mail merge?............................................................................................................4
Creating and registering an address data source............................................................4
Creating a form letter...........................................................................................................6
Editing merged documents.......................................................................................................... 9
Printing mailing labels.........................................................................................................9
Preparing for printing................................................................................................................. 10
Removing blank lines from labels..............................................................................................12
Printing...................................................................................................................................... 13
Editing a saved file of mailing labels..........................................................................................13
Printing envelopes.............................................................................................................14
Setting up envelopes for printing................................................................................................14
Merging and printing the envelopes...........................................................................................15
Creating an envelope template..................................................................................................15
Using the Mail Merge Wizard to create a form letter......................................................15
Step 1: Select starting document...............................................................................................15
Step 2: Select document type....................................................................................................16
Step 3: Insert address block...................................................................................................... 16
Selecting the data source (address list)................................................................................16
Selecting the address block.................................................................................................. 18
Matching the fields................................................................................................................19
Step 4: Create salutation........................................................................................................... 20
Step 5: Adjust layout..................................................................................................................21
Step 6: Edit document and insert extra fields.............................................................................22
Step 7: Personalize documents.................................................................................................23
Step 8: Save, print or send........................................................................................................24
Chapter 14 Mail Merge | 3
What is mail merge?
Writer’s mail merge provides features to create and print multiple copies of one item (such as
return address labels, promotional stickers, or t-shirt transfers) or to produce copies that include
variable information (for example names, addresses, and amounts due):
• Form letters (a document to send to a list of recipients).
• Mailing labels, labels for physical file folders, and similar purposes.
• Envelopes.
Variable data is typically derived from a data source, as discussed below. If all output is to be the
same (for example, return address labels), the merge can use manually entered text or images.
This chapter describes the mail merge process. The steps include:
1) Create and register a data source.
2) Create and print form letters, mailing labels, and envelopes.
3) Optionally, save the output in an editable file instead of printing it directly.
Creating and registering an address data source
An address data source is a database containing the name and address records from which
mailing labels and envelopes can be derived. LibreOffice can create the database from
spreadsheets, text files including Writer documents, and databases such as MySQL. If the
information to be used in the mail merge is currently in a format that LibreOffice cannot access
directly, you need to convert it, for example by exporting it to a comma-separated values (CSV) file.
For a data source to be directly accessible from within a Writer document, it must be registered.
You need to do this only once.
1) From within a Writer document, or from the LibreOffice Start Center, choose File > Wizards
> Address Data Source.
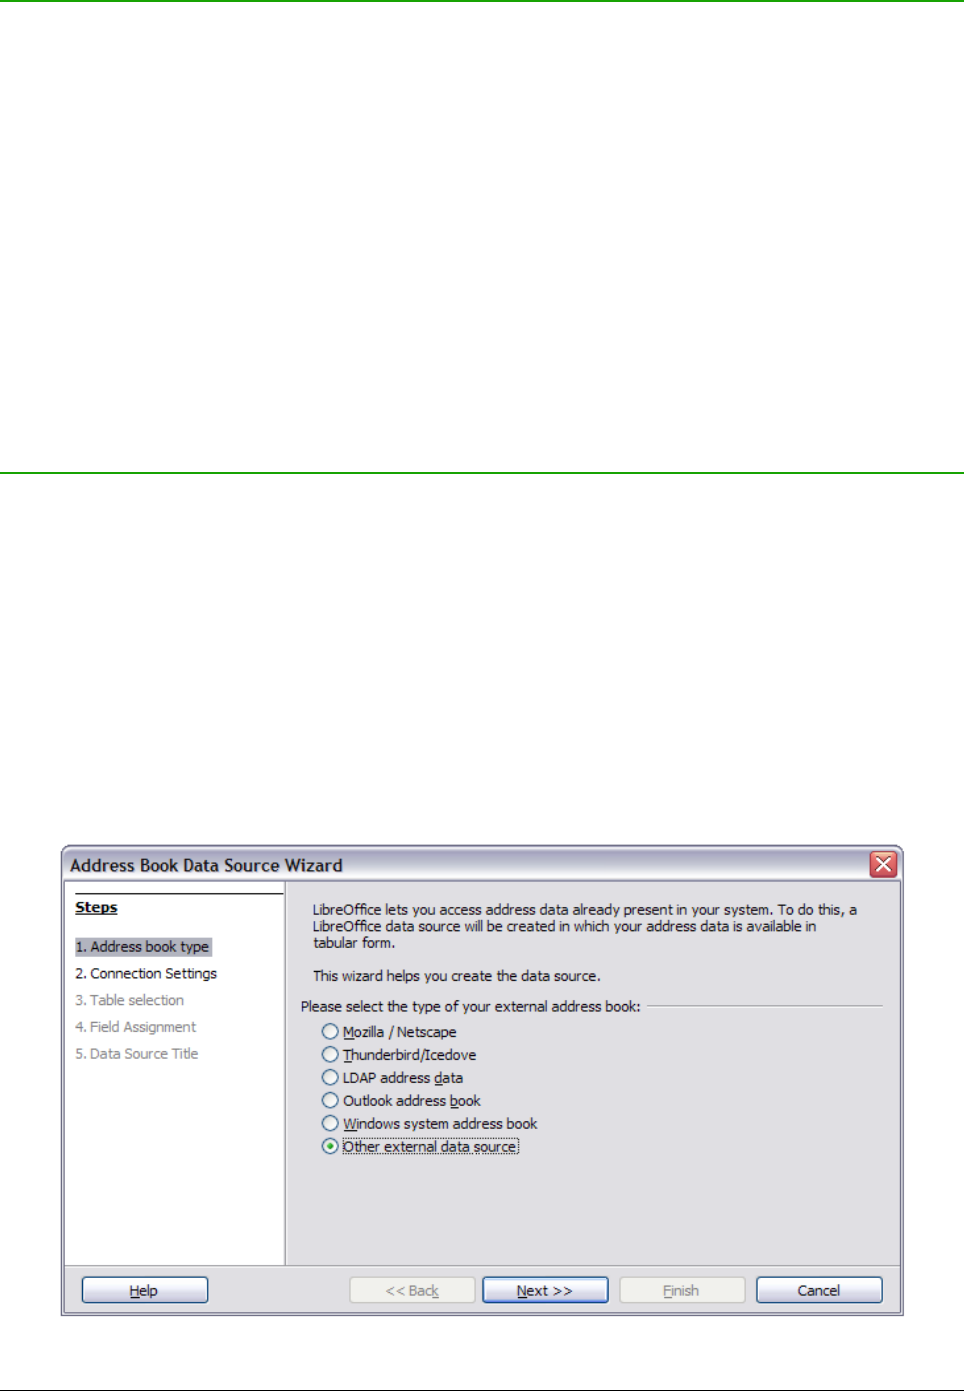
2) The choices on the first page of the wizard vary with your operating system. Select the
appropriate type of external address book. For a spreadsheet, it is Other external data
source. Click Next.
Figure 1: Select type of external address book
4 | Chapter 14 Mail Merge
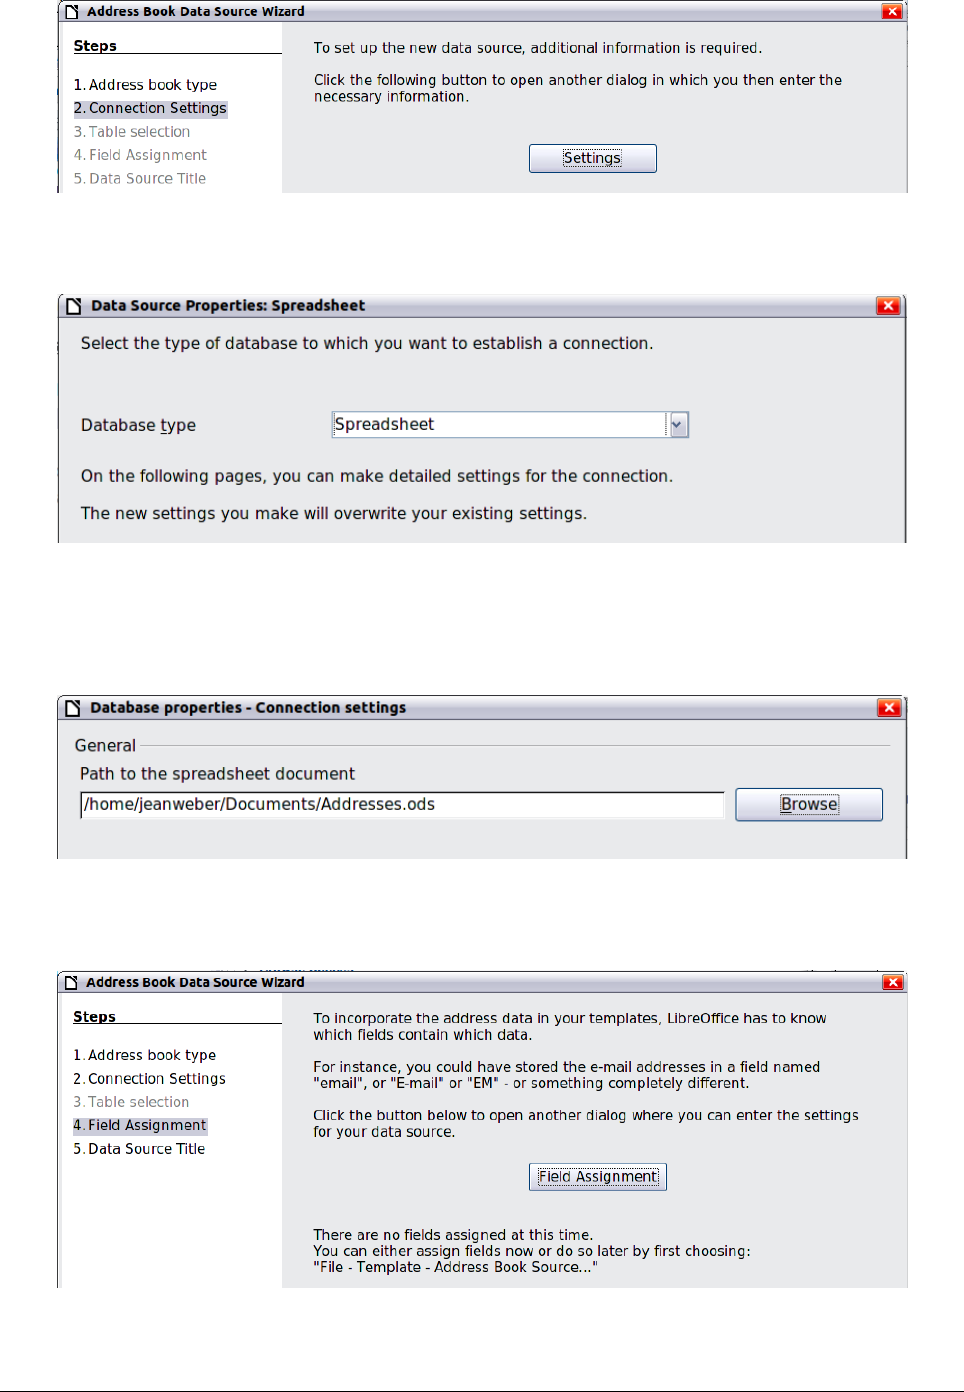
3) On the next page of the Wizard, click the Settings button.
Figure 2: Starting the Settings part of the Wizard
4) On the Data Source Properties page, select the Database type. In our example, it is
Spreadsheet. Click Next.
Figure 3: Selecting the database type
5) On the next page (Figure 4), click Browse and navigate to the spreadsheet that contains
the address information. Select the spreadsheet and click Open to return to this dialog. To
test that the connection has been correctly established, click the Test Connection button in
the middle of the dialog (not shown in illustration).
Figure 4: Selecting the spreadsheet document
6) Click Finish.
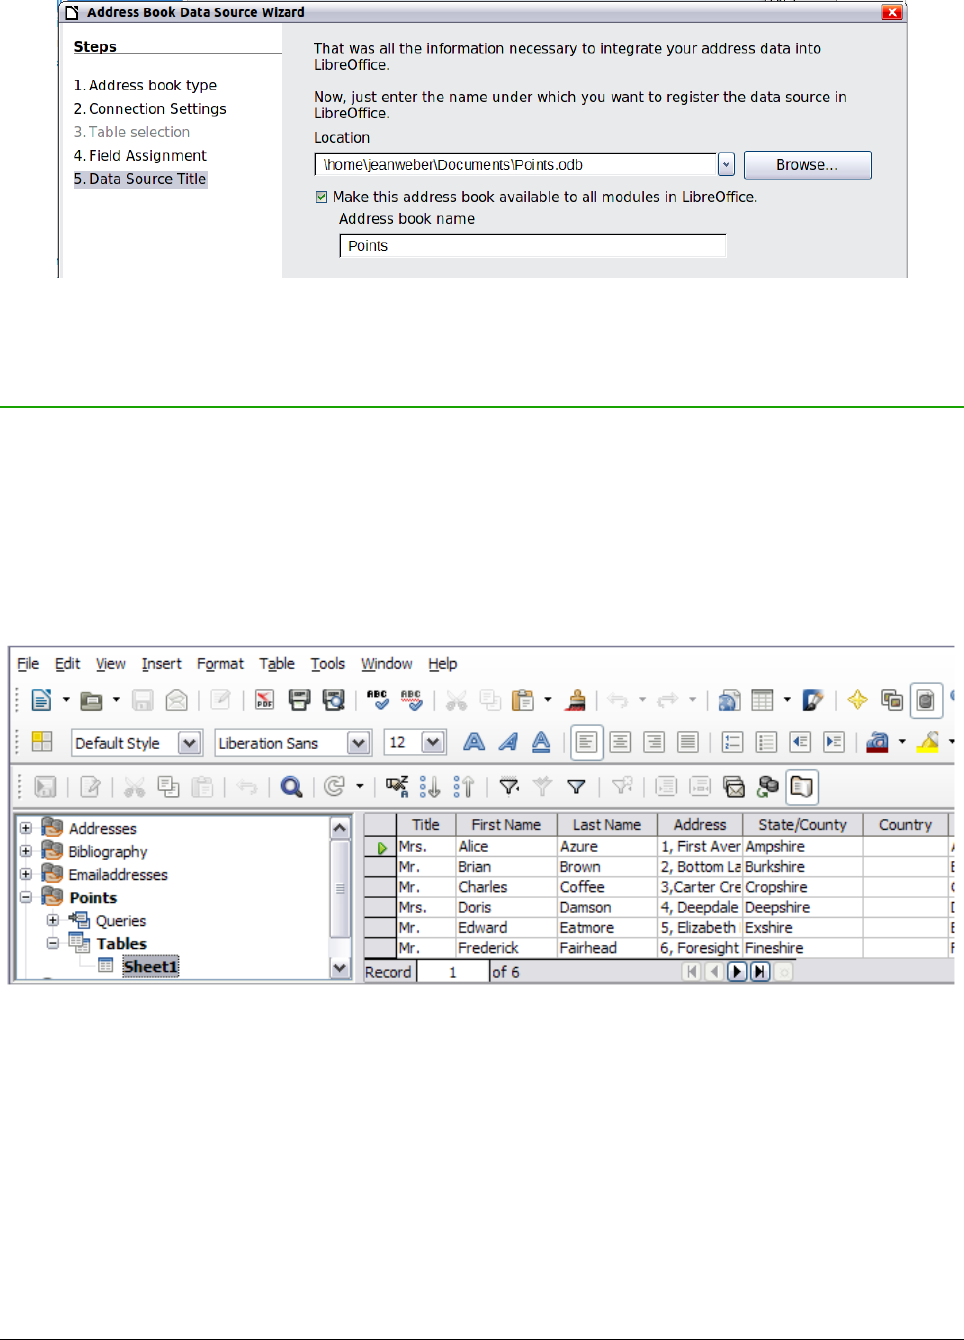
7) At Step 4, click Next. Do not click the Field Assignment button.
Figure 5: For a spreadsheet, do not click the Field Assignment button
Creating and registering an address data source | 5
8) Name the new database (.odb) file in the Location field. Optionally change the name in the
Address book name field; this is the registered name, which LibreOffice displays in data
source listings. In our example, the name Points was used for both.
Figure 6: Name the .odb file and the address book
9) Click Finish. The data source is now registered.
Creating a form letter
You can create a form letter manually—the simplest and most comprehensive method, which is
described here—or you can use the Mail Merge wizard starting on page 15.
1) Create a new Writer document (File > New > Text Document) or open a pre-existing form
letter with File > Open.
2) Display the registered data sources: View > Data sources (or press F4).
3) Find the data source that you wish to use for the form letter, in this case Points. Expand the
Points and Tables folders, and select Sheet1. The address data file is displayed.
Figure 7: Selecting the data source
4) Now create or modify the form letter by typing in the text, punctuation, line breaks, and so
on that will be present in all of the letters.
To add the mail-merge fields where needed (such as names and addresses), click in the
field heading and drag it to the appropriate point in the letter.
Note that address lines should be in individual paragraphs, not separated by line breaks as
might seem preferable. The reason for this will be made clear in the next step.
6 | Chapter 14 Mail Merge
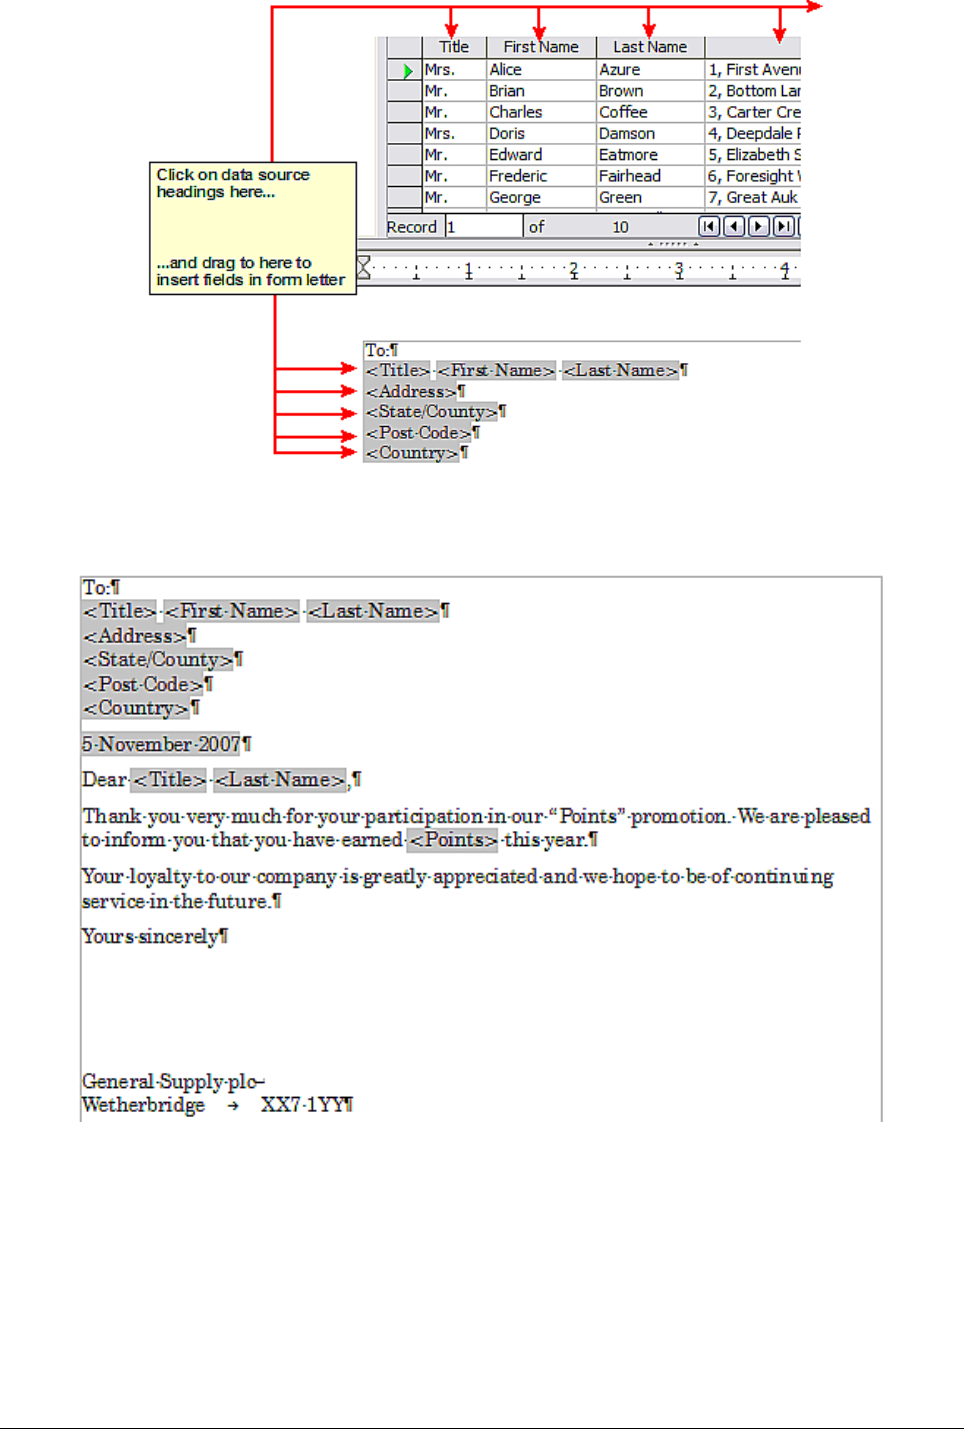
Figure 8: Dragging fields to the body of the form letter
5) Continue until you have composed the entire document. At this time you can suppress any
blank lines that may appear in the resulting letters (Step 6). Otherwise, go to Step 7.
Figure 9: The completed form letter
6) To suppress blank lines:
a) Click at the end of the first paragraph to be suppressed if empty, and then choose
Insert > Field > More Fields to display the Fields dialog.
b) Select the Functions tab and then click on Hidden Paragraph in the Type column.
Creating a form letter | 7
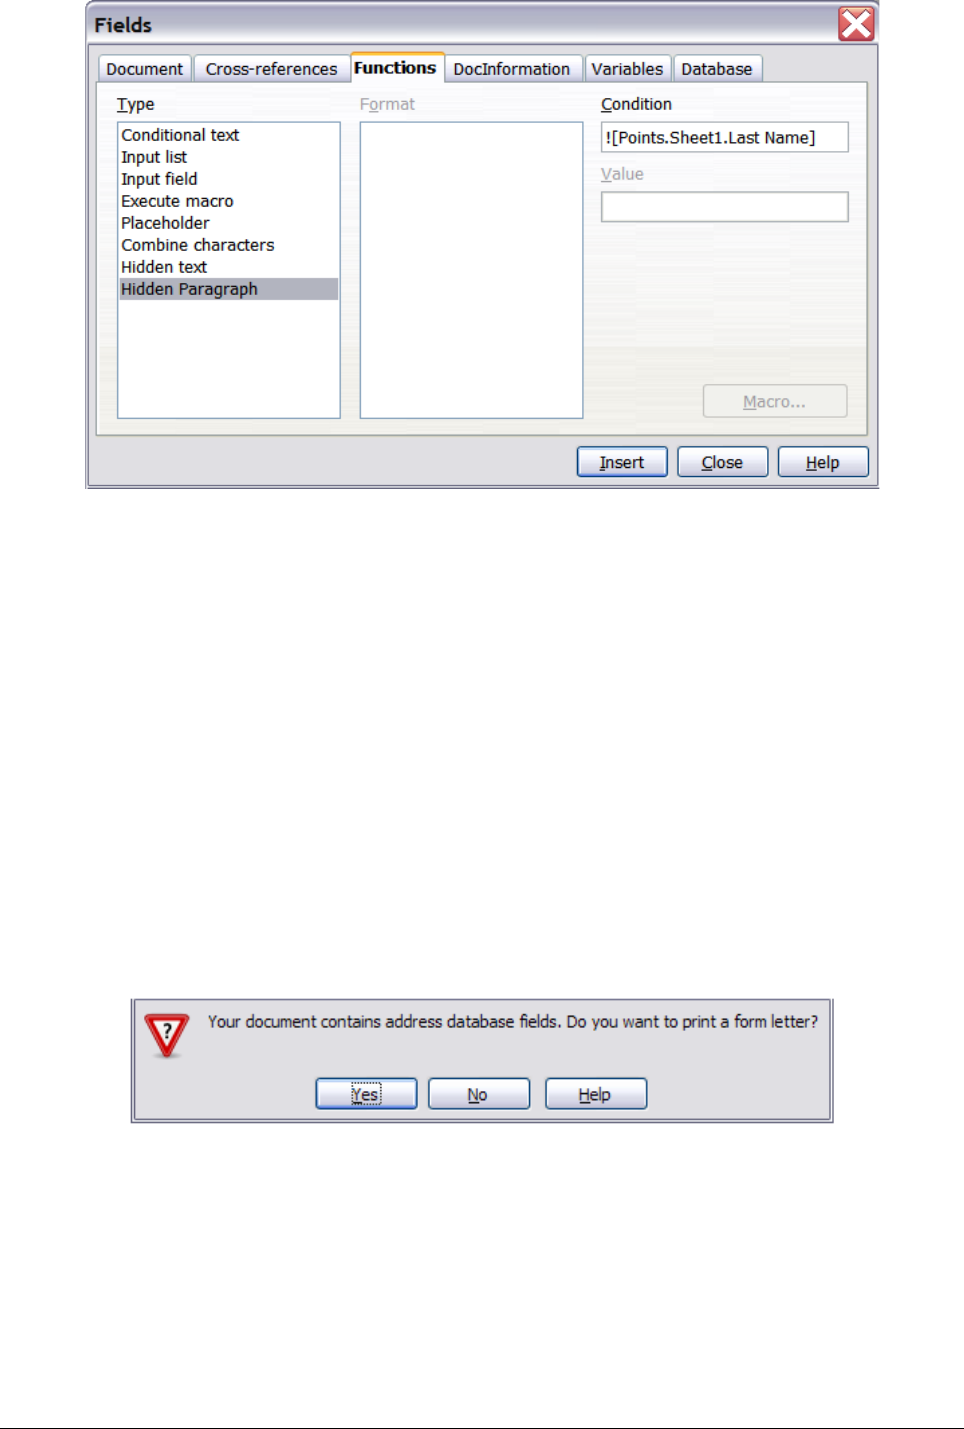
Figure 10: Hidden paragraph insertion
c) Now click in the Condition box and enter the details of the condition that defines a
blank address field. It has the general form of:
![Database.Table.Database field]
where the ‘!’ (NOT) character indicates the negative case and the square brackets
indicate the condition.
For example, in our Points database the condition to test if the Last Name field is empty
would be:
![Points.Sheet1.Last Name] as illustrated in Figure 10.
To test for multiple conditions use the operators AND and/or OR between the
conditional statements, for example:
![Points.Sheet1.Title]AND![Points.Sheet1.Last Name]
d) Click Insert, but do not close the dialog until you have amended all the lines that should
be suppressed.
7) The document is now ready to be printed.
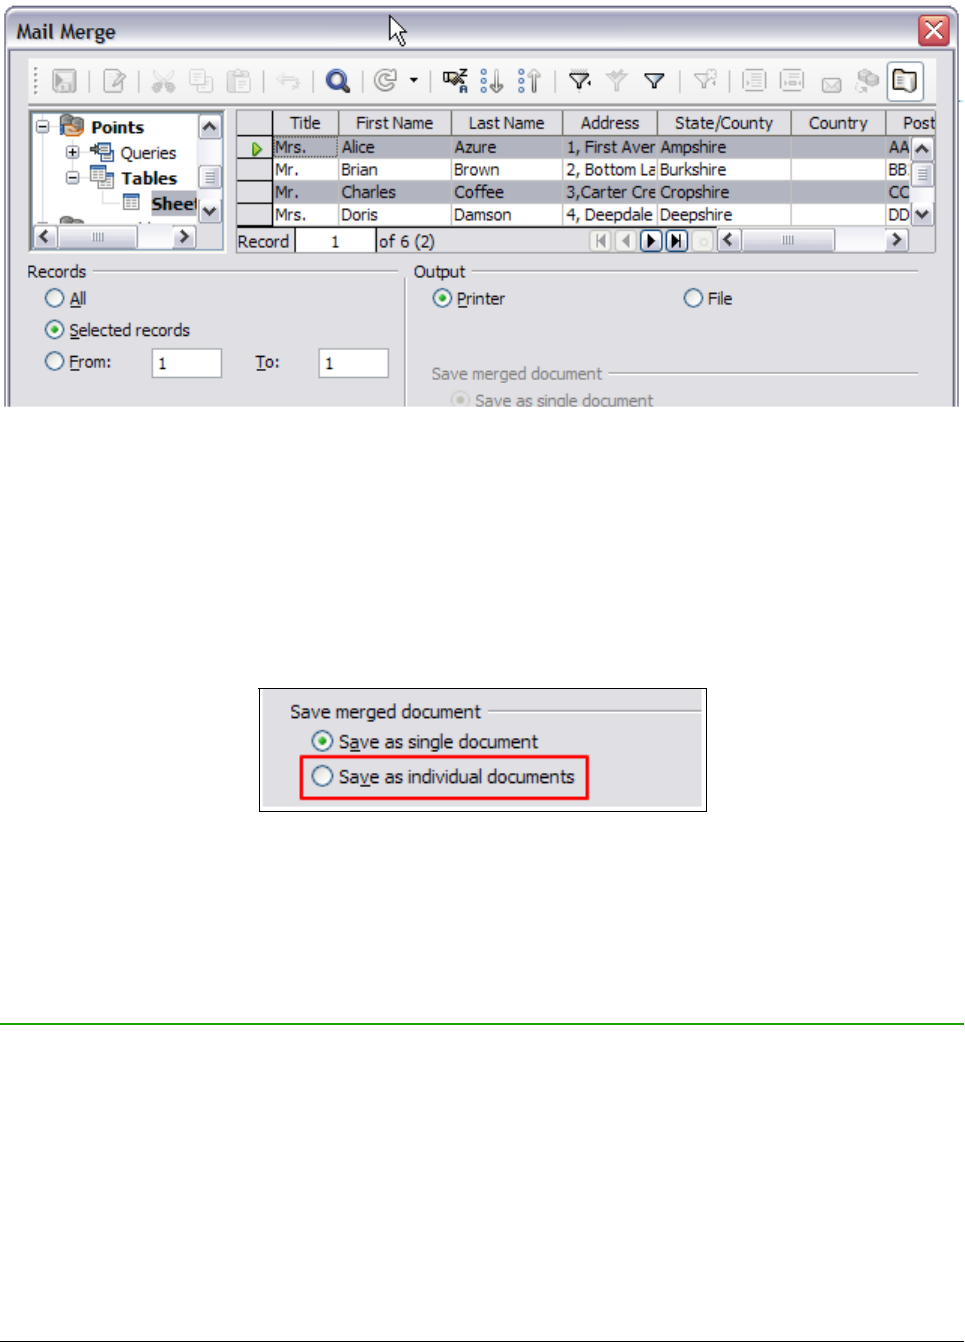
a) Choose File > Print and respond with Yes in the message box.
Figure 11: Mail merge confirmation message
b) In the Mail Merge dialog (Figure 12), you can choose to print all records or selected
records. To select records to be printed, use Ctrl+click to select individual records. To
select a block of records, select the first record in the block, scroll to the last record in
the block, and Shift+click on the last record.
c) Click OK to send the letters directly to the printer. Or, you can save the letters to a file
for further editing or formatting; see “Editing merged documents” below.
8 | Chapter 14 Mail Merge
d) If you have not saved the original, prototype form letter document (template) previously,
then you should do so now. Having a form letter template could greatly simplify the
creation of other form letters and is highly recommended.
Figure 12: The Mail Merge dialog
Editing merged documents
You may prefer to save the letters to a file, to allow for proofreading or formatting. To do this:
1) In the Mail Merge dialog (Figure 12), select File in the output section, instead of using the
default Printer selection.
2) This changes the dialog to display the Save merged document section, where Save as
single document is preselected. You can choose to save each letter as an individual
document instead.
3) Click OK. In the Save as dialog, enter a file name for the saved letters and choose a folder
in which to save them. The letters will be saved consecutively as separate pages in the
single document, or numbered consecutively in individual files if saved as individual
documents.
You can now open the letters and edit them individually as you would edit any other document.
Printing mailing labels
Labels are commonly used for printing address lists (where each label shows a different address),
but they can also be used for making multiple copies of one label only, for example return-address
stickers, or labels for CDs/DVDs or other items.
Before beginning this process, note the brand and type of labels you intend to use. You can also
define your own label size; see Step 4.
Printing mailing labels | 9
Tip
If you are printing the same information on each label, you may find the Business
Cards dialog useful. Access it through File > New > Business Cards. The Labels and
Business Cards dialogs are very similar.
Preparing for printing
To prepare mailing labels for printing:
1) Choose File > New > Labels. The Labels dialog opens.
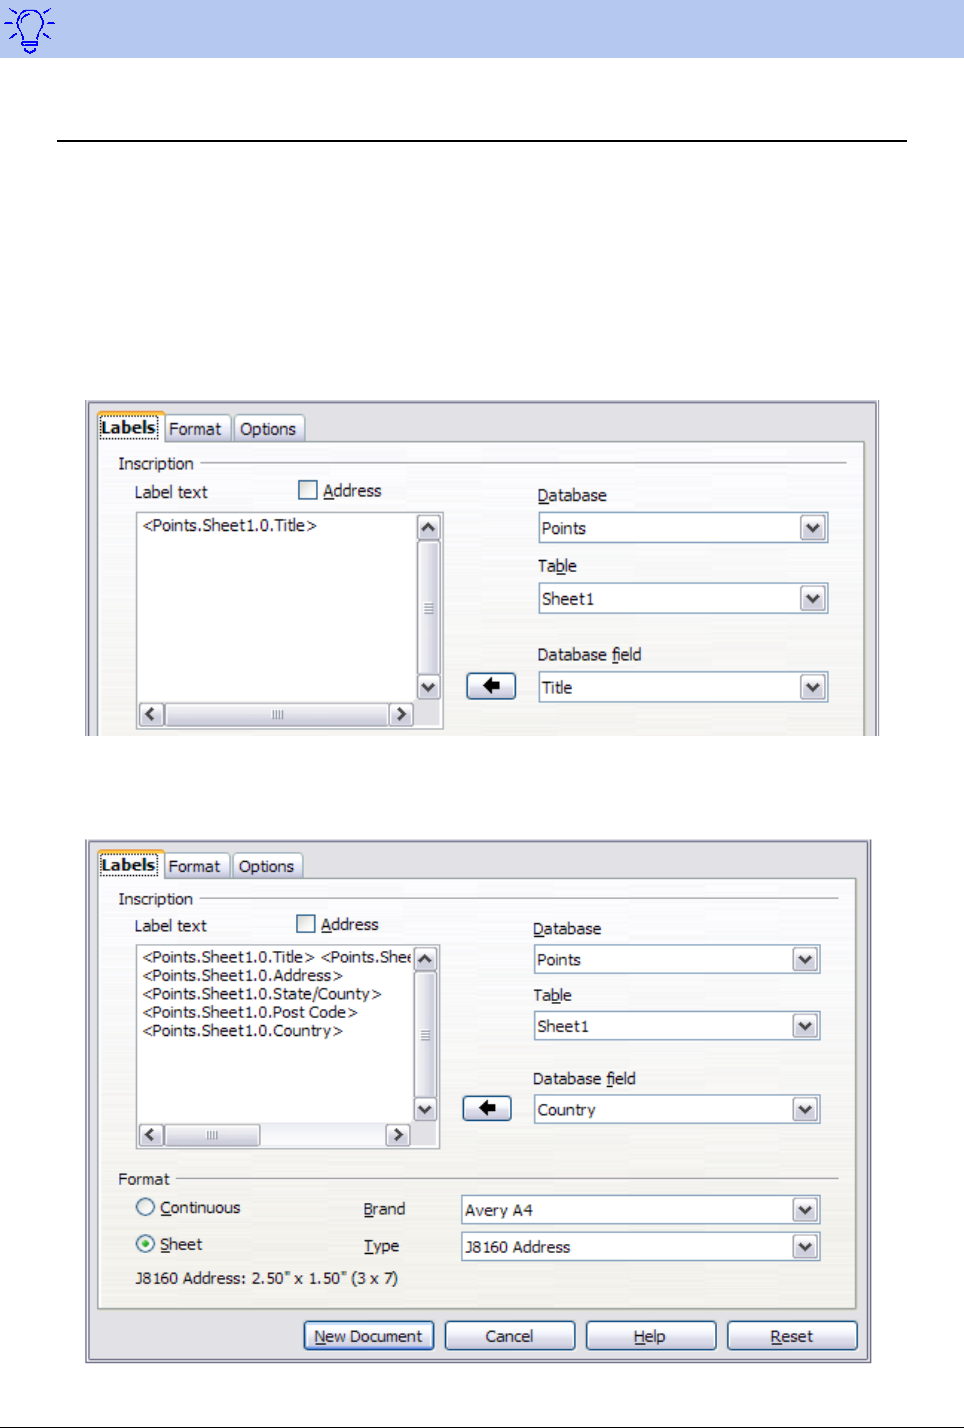
2) On the Labels page (Figure 13), select the Database and Table.
3) Click the drop-down arrow under Database field. Select the first field to be used in the
label (in this example, Title). Click the left arrow button to move this field to the Label text
area, as shown in Figure 13.
Figure 13: Move fields from Database field list to Label text area
4) Continue adding fields and inserting desired punctuation, spaces, and line breaks until the
label is composed. Figure 14 shows the completed label.
Figure 14: The completed label
10 | Chapter 14 Mail Merge
5) Select the label stock in the Brand drop-down list. The types for that brand then appear in
the Type drop-down list. Select the size and type of labels required. Go to Step 7.
If your label sheets are not listed, go to Step 6.
6) You can define the labels you have:
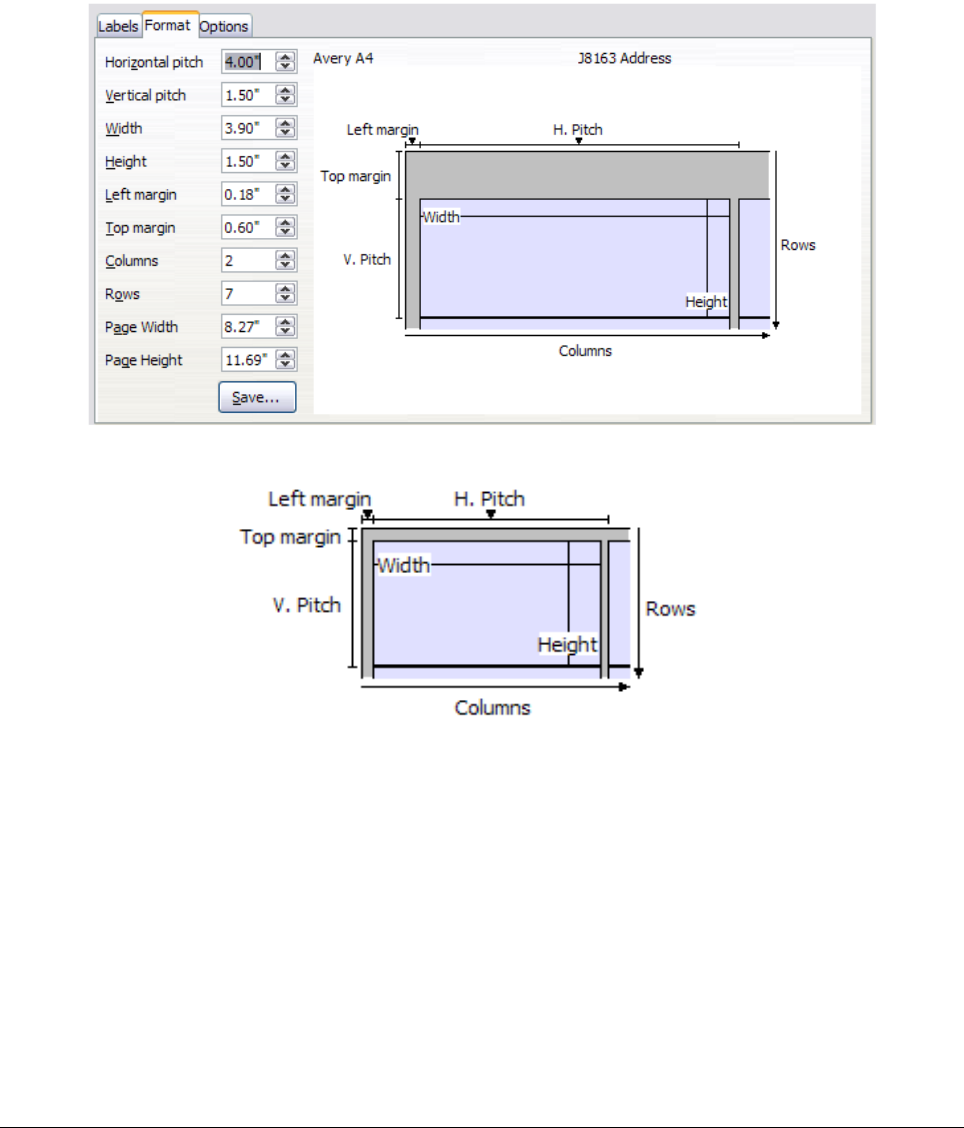
a) Select [User] in the Type box on the Labels page. Then, click the Format page of the
Labels dialog (Figure 15). Measure on your labels those dimensions illustrated in Figure
16, and enter them into the respective boxes on the left side.
Horizontal pitch is the distance between the left edges of adjacent labels.
Vertical pitch is the distance between the upper edge of a label and the upper edge of
the label directly below.
Figure 15: Specify settings, if necessary
Figure 16: Required information for label set-up
b) You can now save the label template if you are likely to use it again. Click Save.
c) In the Save Label Format dialog that pops up, enter names for your label Brand and
Type. Click OK.
7) On the Options page, select Synchronize contents.
8) Click New Document. You now have a new, single-page document containing a series of
frames, one for each label of the selected type and filled with the data source address fields
that you selected. Quite often some of the fields in your address data source will be
unused, leading to blank lines in your labels. If this is not important, go to “Printing” on page
13; otherwise, continue with “Removing blank lines from labels” below.
Printing mailing labels | 11
Removing blank lines from labels
1) First ensure that the label frames are showing the field contents (data source headings),
rather than their underlying field names. If this is not the case, then either press Ctrl+F9 or
choose View > Field Names to toggle the view.
2) Next, ensure that you can see non-printing characters, such as paragraph marks and line
breaks. If these are not already visible, choose View > Formatting Marks from the Menu
bar, or press Ctrl+F10, or click on the Formatting Marks icon on the Standard toolbar.
You will now see that address field separation is created by line breaks ( ), rather than
paragraphs ( ). The suppression of blank address fields depends on hiding paragraphs,
not lines, so you need to replace line breaks with paragraphs.
3) Click in the first label, at the end of the last data source address field in the first line of the
label. Press Delete to remove the new line character and then press Return (or the Enter
key) to insert a paragraph marker. Repeat this action for each line in the address.
If the line spacing in the first label is not satisfactory, you may wish to correct this before
proceeding, by modifying the paragraph style associated with the address. Unless you have
changed it, the address uses the Default style.
Caution
The objective of Step 3 is to replace all line breaks at the end of data source address
fields with paragraphs. Sometimes the address data field may be longer than the width
of the label and will wrap to the next physical line: make sure that you are not misled
by this into deleting and replacing anything other than line break characters.
4) Click again at the end of the first paragraph to be conditionally suppressed and then choose
Insert > Fields > More Fields. Select the Functions tab and then click on Hidden
Paragraph in the Type column. Now click in the Condition box and enter the details of the
condition that defines a blank address field. It has the general form of:
![Database.Table.Database field]
where the ‘!’ (NOT) character indicates the negative case and the square brackets indicate
the condition.
For example, in our Points database the condition to test if the Last Name field is empty
would be
![Points.Sheet1.Last Name] as illustrated in Figure 10.
To test for multiple conditions, use the operators AND and/or OR between the conditional
statements, for example:
![Points.Sheet1.Title]AND![Points.Sheet1.Last Name]
Click Insert, but do not close the dialog until all lines have been amended.
5) Repeat for each paragraph to be conditionally suppressed, remembering to place the
cursor at the end of the line before changing the last element of the condition and Inserting
the result.
Caution
The last paragraph of the label address block ends with a special field,
Next record:Database.Table (Next record:Points.Sheet1 in our
example); the Hidden paragraph field must be inserted before this field. This can
generally be accomplished by clicking at the end of the paragraph and then using the
Left Arrow key once to skip back over it. If you omitted this action, you will find that
some records have been skipped and are missing from the final output.
12 | Chapter 14 Mail Merge

6) Remembering that we selected Synchronize contents
earlier, you should now see a small window containing
a Synchronize Labels button. Click this button and the
hidden paragraph fields are propagated to all the labels
in your document. (If you do not select Synchronize, then labels can be edited individually.
You now have a template suitable for future use with the same data source and type of
label. If you wish to save it, use File > Templates > Save as Template to save it as an
Open Document Text Template (.ott).
Printing
1) Choose File > Print. The message shown in Figure 11 appears. Click Yes to print.
2) In the Mail Merge dialog (Figure 12), you can choose to print all records or selected
records. To select records to be printed, use Ctrl+click to select individual records. To select
a block of records, select the first record in the block, scroll to the last record in the block,
and Shift+click on the last record.
3) Click OK to send the labels directly to the printer.
Note
If you prefer to save the labels to a file, perhaps to allow later editing such as changing
the typeface or paragraph format, then select File in the output section of the Mail
Merge dialog, not the default Printer selection. This changes the dialog to highlight the
Save merged document section, where Save as single document is preselected.
In this case, clicking OK brings up the Save as dialog, where you can enter a file name
for the saved labels.
If you did not save the prototype label fields document (template) earlier, then you are
prompted to do so now by another Save as dialog.
In either case, whether printing or saving to file, despite there apparently being only
one page of labels, the printed or saved output will be expanded to include all of the
selected records from the data source.
Editing a saved file of mailing labels
To edit a saved file of mailing labels, open the saved label file in the same way as any other Writer
document. You will be prompted to update all links. Choose No: If Synchronize was selected, all
labels will end up containing the same data, which may not be what you want.
You can edit individual records in the normal way, by highlighting and changing the font name, for
example. However, you cannot edit all labels globally (for example, to change the font name for all
records) by the technique of selecting the entire document.
Instead, edit the paragraph style associated with the label records:
1) Right-click in a label record. Select Edit Paragraph Style from the context menu.
2) Then from the Paragraph Style dialog, you can make changes to the font name, the font
size, the indents, and other attributes.
Printing mailing labels | 13
Printing envelopes
Instead of printing mailing labels, you may wish to print directly onto envelopes. By selecting Insert
> Envelope from the Menu bar, you can select one of two methods for their production: either the
envelope is embedded within a letter, generally as the first page (Insert in the Envelope dialog), or
the envelope is an independent document (New Document in the dialog). In each case the
addressing data may be manually entered, for example by copying and pasting from the letter with
which it is associated, or it may originate within an address data source.
The production of envelopes involves two steps, setup and printing. For general instructions on
setting up envelopes for printing, see “Printing envelopes” in Chapter 7, Printing, Exporting, E-
mailing. This section describes the use of an address data source.
Setting up envelopes for printing
1) Choose Insert > Envelope from the Menu bar.
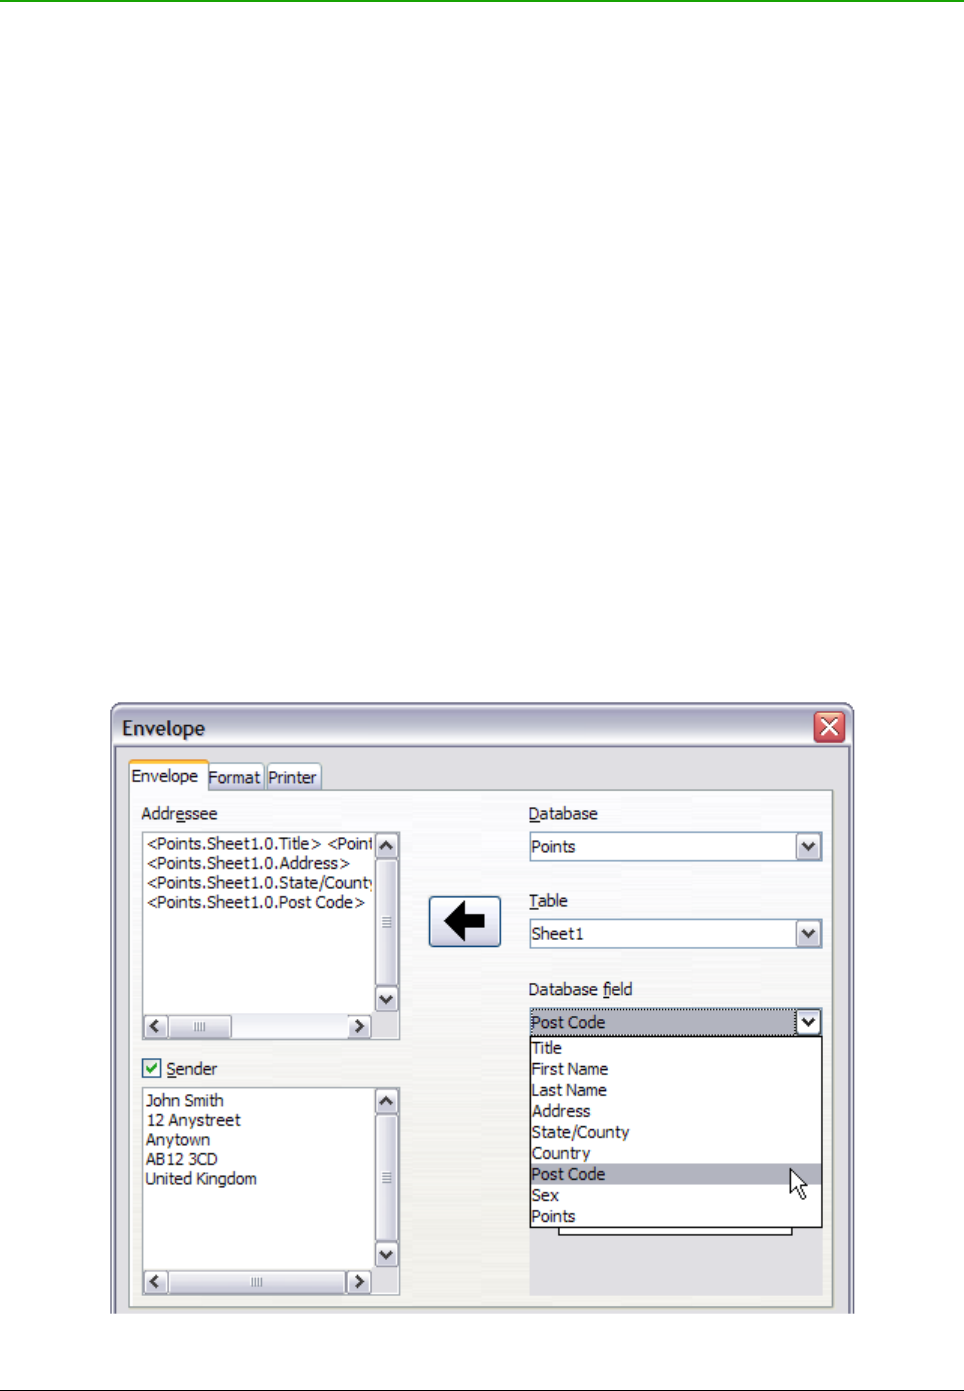
2) On the Envelope page of the Envelope dialog (Figure 17), choose whether to add Sender
information to the envelope and edit the information in the Sender box (Sender is the “from”
on the envelope).
3) Create the Addressee fields by dragging and dropping from the data source headings (as
described in “Creating a form letter” on page 6, and in particular in Figure 8) or by using the
facilities of the Envelope tab.
4) If you prefer dragging and dropping, then click New Document, drag your data source
headings into the Addressee area on your new envelope and skip to step 10), otherwise
continue with the next step.
5) Verify, add, or edit the information in the Addressee box. You can use the right-hand drop-
down lists to select the database and table from which you can access the Addressee
information, in a similar fashion to that described for “Printing mailing labels” on page 9.
Figure 17: Choosing addressee and sender information for envelopes
14 | Chapter 14 Mail Merge

6) When you have finished formatting, click either the New Document or Insert button to
finish. New Document creates only the envelope template in a new document, whereas
Insert inserts the envelope into your current document as page 1.
7) Quite often some of the fields in your address data source will be unused, leading to blank
lines in the envelope Addressee area. If this is not important, go straight to “Merging and
printing the envelopes” on page 15, otherwise continue as described in “Removing blank
lines from labels” on page 12.
Merging and printing the envelopes
To merge addresses and print the envelopes:
1) Choose File > Print. A message box appears. Click Yes.
2) The Mail Merge dialog (Figure 12) appears. As with form letters and mailing labels, you can
choose to print envelopes for one, several or all address records in the database.
3) Make your selections and then click OK to print direct to the printer. To check the envelopes
before printing them, see “Editing merged documents” on page 9 for instructions.
Creating an envelope template
When your envelope layout and fields are complete to your satisfaction, you can save the result as
a template.
1) Choose File > Templates > Save As Template.
2) In the Templates dialog, click Save.
3) Type a name and click OK to save the template.
Using the Mail Merge Wizard to create a form letter
The manual method of creating a form letter described in “Creating a form letter” on page 6
provides the most control over the result and is therefore recommended. If you prefer to use the
Mail Merge wizard, the technique is described below.
Open a new document with File > New > Text Document and start the Mail Merge wizard using
Tools > Mail Merge Wizard. The wizard opens, as shown in Figure 18.
Step 1: Select starting document
The wizard gives several options for the starting document:
• Use the current document.
• Create a new document.
• Start with an existing document.
• Start from a template.
For the purposes of this example, we assume that you opened a new text document.
Select Use the current document and click Next.
Using the Mail Merge Wizard to create a form letter | 15

Figure 18: Select starting document
Step 2: Select document type
The wizard can produce letters or email messages. In this example, we are producing a letter.
Select Letter and click Next.
Figure 19: Choose document type
Step 3: Insert address block
This is the most complex step in the wizard. In this step (Figure 20) you will do three things:
1) Tell the wizard which data source to use. The data source must be an existing file; in this
example it is the “Points” spreadsheet created earlier.
2) Select the address block to use in the document. This means choosing which fields appear
(for example, whether the country is included) and how they look.
3) Make sure that the fields all match correctly. This is very important. For example, the UK
English version of the wizard has a field called <Surname>. If your spreadsheet has a
column called “Last Name”, you need to tell the wizard that <Surname> and “Last Name”
are equivalent. This is described in “Matching the fields” on page 19.
Selecting the data source (address list)
1) If the current address list, identified beneath the Select Different Address List button in
section 1, is not the one you wish to use, click the button to open the Select Address List
dialog (Figure 21) for choosing a data source.
If you have not already created the address list, you may click Create to do so now. This
step will allow you to create a .csv (Comma Separated Values) file with a new list of
address records. If you have an address list that is not registered in LibreOffice, but which
you wish to use, click Add and select the file from the location in which it is saved.
In each of these cases a new data source (.odb file) will be created and registered.
16 | Chapter 14 Mail Merge

Figure 20: Insert address block
2) Select the address list and click OK to return to step 3 of the wizard. We retain “Points” as
our address book for this example. The wizard can also exclude certain records; click Filter
to choose them.
Figure 21: Select address list dialog
Using the Mail Merge Wizard to create a form letter | 17
Selecting the address block
1) In section 2 (shown in Figure 20), select the address block to appear on the letter, define its
appearance, and choose the fields it contains. The main page gives two choices. Click
More to open the Select Address Block dialog for more choices.
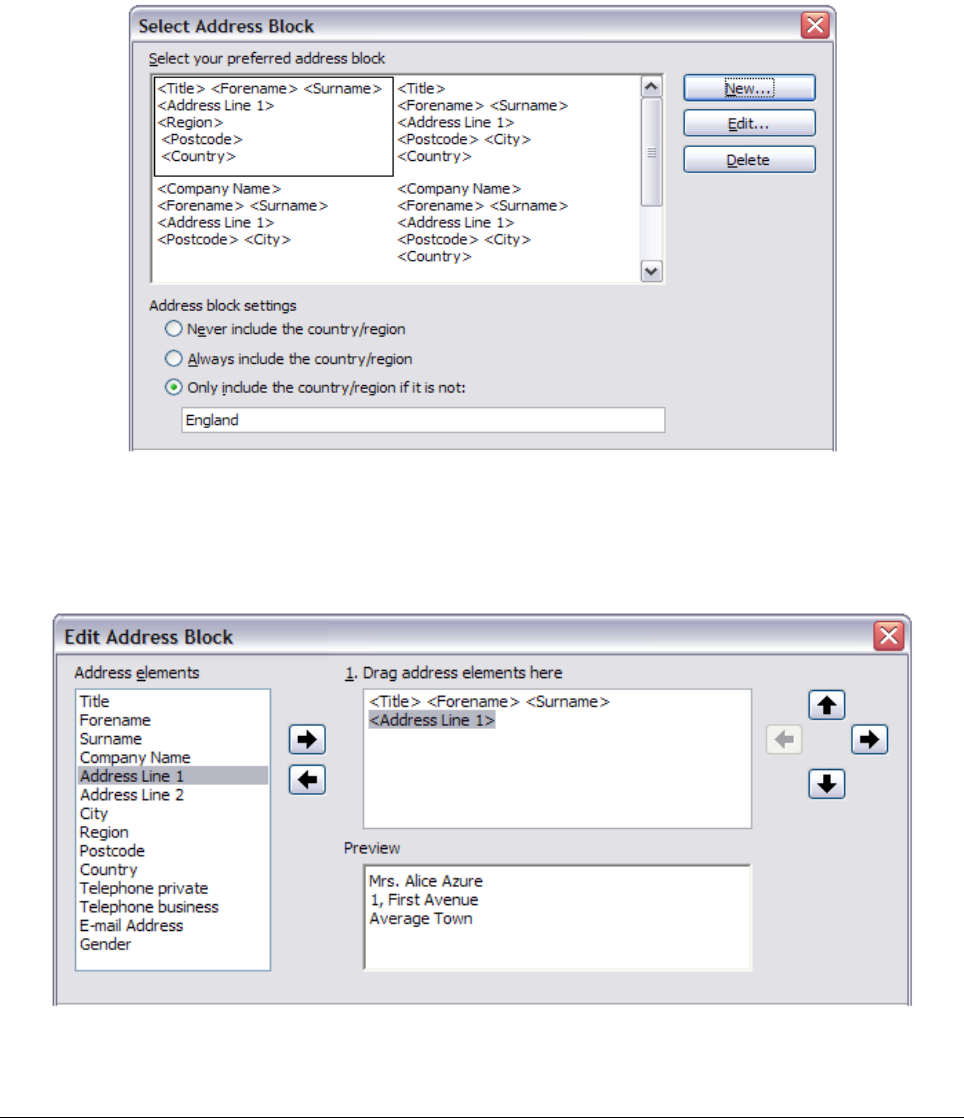
2) The Select Address Block dialog (Figure 22) displays the original two blocks plus other
choices for the format of the address block (you may need to scroll down to see all of the
choices). You can also optionally include or exclude the country (for example, only include
the country if it is not England) in the Address block settings. The formats provided are
relatively common, but they might not exactly match your preference. If this is the case,
select the address block that is closest to what you want and click Edit, which opens the
Edit Address Block dialog.
Figure 22: Select address block
3) In the Edit Address Block dialog, you can add or delete address elements using the arrow
buttons on the left. To move elements around, use the arrow buttons on the right. For
example, to add an extra space between forename and surname in Figure 23, click
<Surname> and then click the right arrow button.
Figure 23: Edit address block
18 | Chapter 14 Mail Merge
Matching the fields
Finally, it is time to match the wizard’s fields with the spreadsheet fields, so that items like
<Surname> and “Last Name” match correctly.
1) Look at section 3 of the wizard (shown in Figure 20 on page 17). The box at the bottom
displays one record at a time, using the address block format you specified. Use the right
and left arrow buttons below that address box to step through the addresses, checking that
they display correctly. Do not assume that all the records display correctly, just because one
or two do.
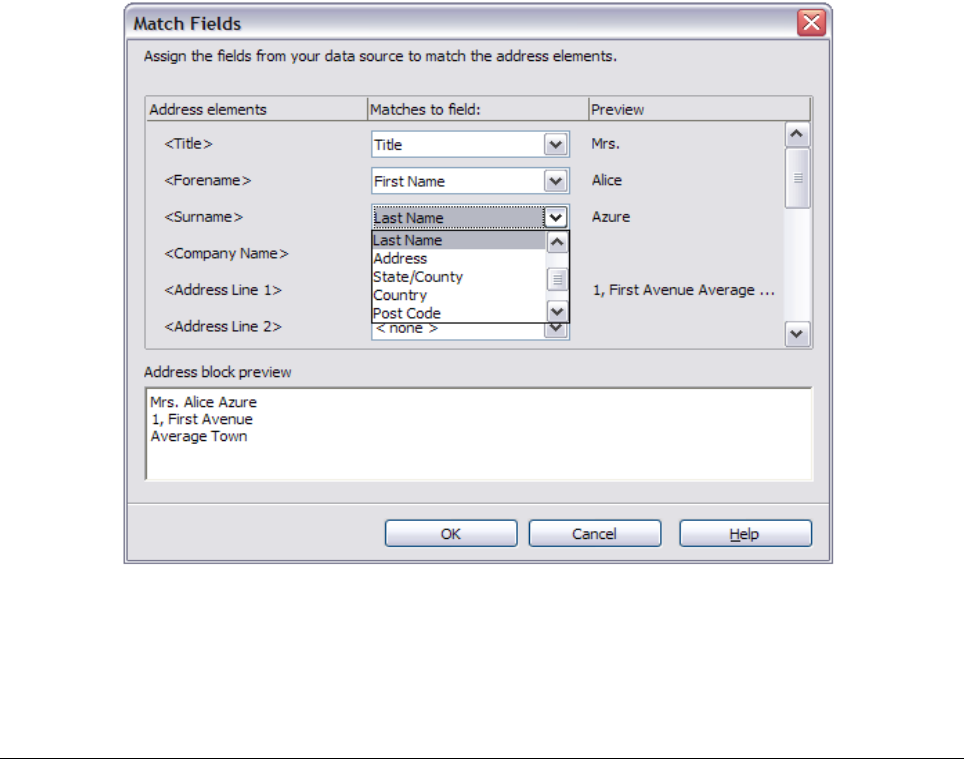
2) If the addresses do not display correctly, click Match Fields.
The Match Fields dialog (Figure 24) has three columns:
– Address Elements are the terms the wizard uses for each field, such as <Forename>
and <Surname>.
– Use the Matches to Field column to select, for each address element, the field from
your data source that matches it.
– The Preview column shows what will be shown for this field from the selected address
block, so you can double-check that the match is correct.
3) When you have matched all the fields, click OK to return to step 3 of the wizard. Now, when
you use the arrow buttons to look at all the addresses, they should all look correct. If not, go
back and change anything you’re not happy with, before clicking Next to move to step 4.
Note that you will not be able to continue until you have correctly matched all the fields in
your chosen address block. If you see <not yet matched> in a field position it indicates that
the field in question is not correctly matched.
Figure 24: Match fields dialog
4) Notice the option for Suppress lines with empty fields in section 2 of Figure 20. Using the
Wizard, you do not have to create your own conditional suppression fields.
Using the Mail Merge Wizard to create a form letter | 19
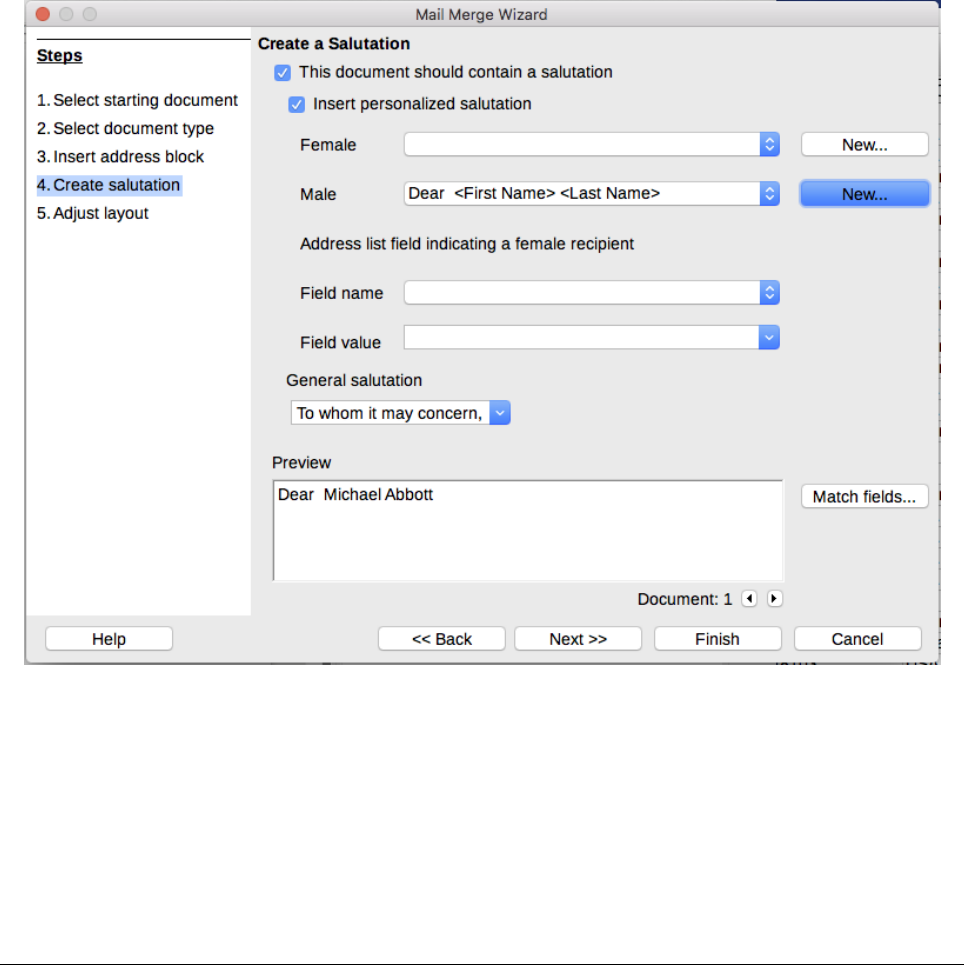
Step 4: Create salutation
It is possible to create just about any salutation you want in this step.
Select This document should contain a salutation to enable the General salutation list box.
Some general texts are available in the list box, or you can enter your own text. A preview pane
displays your choice.
Select Insert personalized salutation to enable further salutation constructs.
You can, for example, use a different greeting for men and women. To do this, Writer must have
some way of knowing whether a person is male or female. In a spreadsheet, you might have a
column called Gender. In the section Address list field indicating a female recipient, set the Field
name to Gender and the Field value to F. The Male salutation is then printed for all men and the
Female salutation for all women. Unfortunately, LibreOffice does not provide for other genders;
however, you can use a non-gendered salutation.
If you do not have such a column in your spreadsheet, or if you do not need to distinguish between
genders in the salutation, then you can leave the Field name and Field value boxes empty and use
the customized content of the Male list box for the salutation to all recipients.
Figure 25: Create a salutation
As an example:
1) Click the New button alongside the Male list box. The Custom Salutation (Male Recipients)
dialog opens (see Figure 26).
2) Select Salutation in the Salutation elements listings.
3) Click the arrow button to add it to box 1.
4) Open the list box choices for box 2, select an appropriate greeting or type your own text
into the list box. Edit it as needed.
20 | Chapter 14 Mail Merge
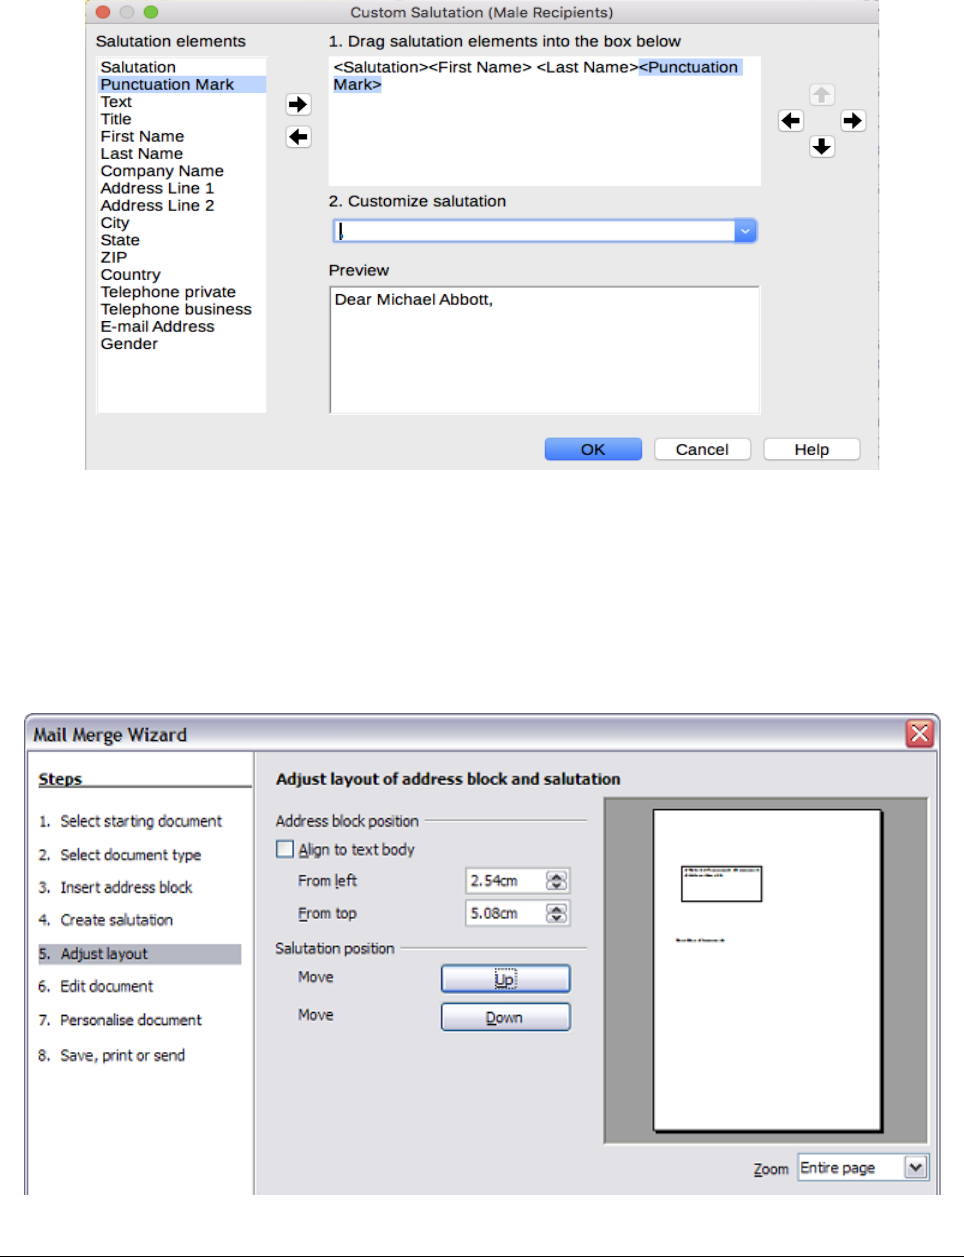
5) Select and move across First Name from the Salutation elements listings into box 1.
6) Type a space and then move Last Name across.
7) Finally, move Punctuation Mark across and select the comma from the choices in box 2.
8) The construct is shown in the Preview box.
9) Carry out any final editing. Click OK.
Figure 26: Customizing the salutation
This method allows you to use gender neutral titles such as Doctor (Dr) and Reverend (Rev), or
titles such as Ms, or omit titles.
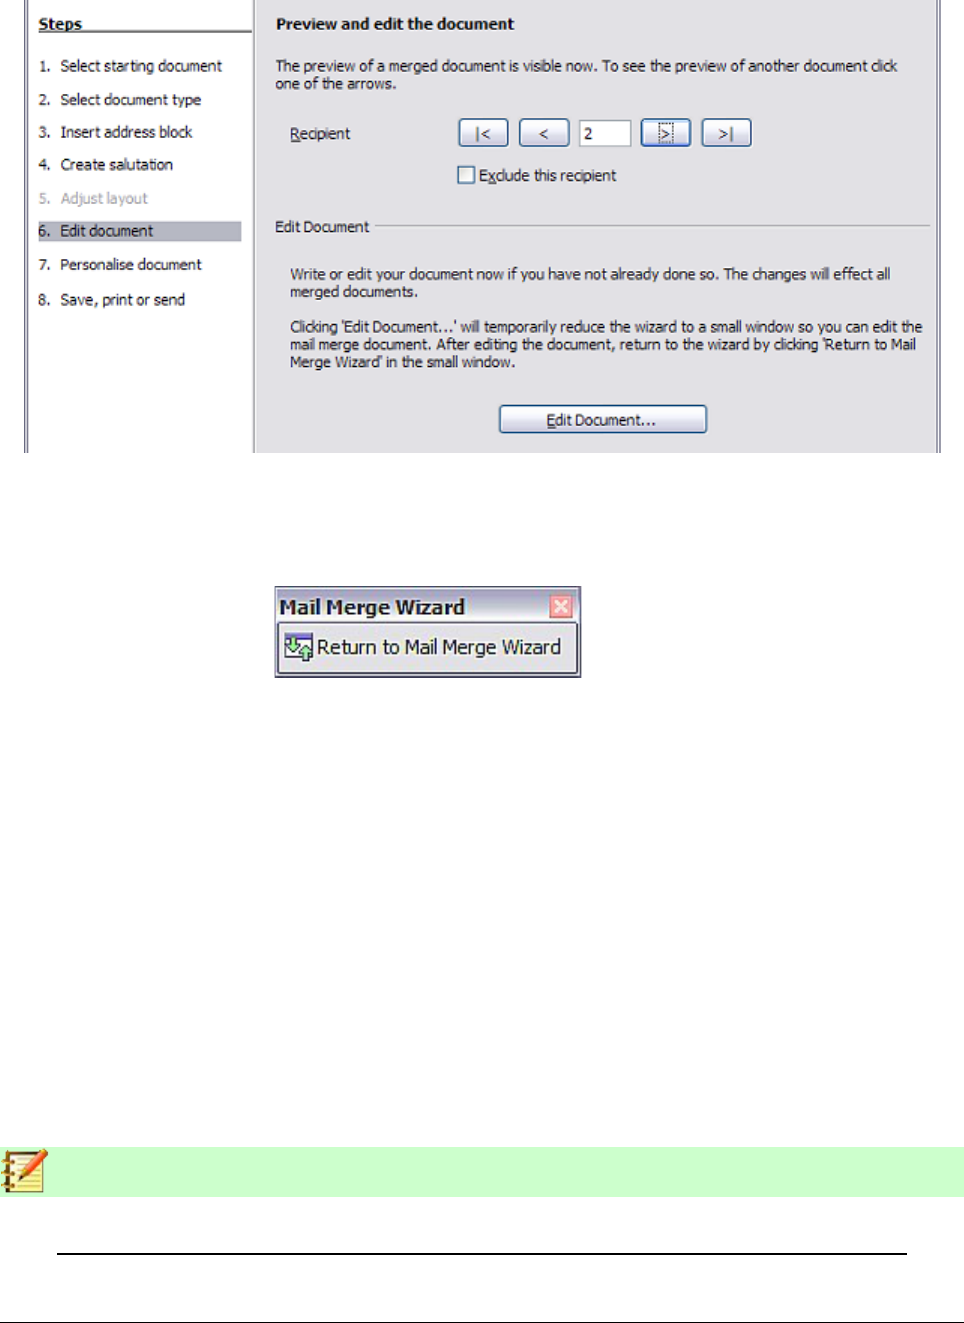
Step 5: Adjust layout
In step 5, you can adjust the position of the address block and salutation on the page. You can
place the address block anywhere on the page. The salutation is always on the left, but you can
move it up and down the page. Use the buttons shown in Figure 27 to move the elements.
Figure 27: Adjust layout
Using the Mail Merge Wizard to create a form letter | 21
Step 6: Edit document and insert extra fields
In step 6 you have another opportunity to exclude particular recipients from the mail merge, as
shown in Figure 28.
Figure 28: Edit document
You can also edit the body of the document. If you started with a blank document, you can write
the whole letter in this step. Click Edit Document to shrink the wizard to a small window (Figure
29) so you can easily edit the letter.
Figure 29: Minimized mail merge wizard
You need to perform another important task in this step. The wizard only inserts information from
the name and address fields, but you may wish to add additional data. In our example, we want to
tell each person how many points they had accumulated during the year; that information is in the
database. To do this:
1) Click Edit Document in step 6 of the wizard.
2) Choose Insert > Fields > Other Fields. The Fields dialog opens.
3) Click the Database tab.
4) On the left hand side, select Mail merge fields.
5) Under Database selection find your data source (in this example, it is Points). Expand it to
see the fields.
6) Click the field you want to insert (Points), then click Insert to insert the field.
7) You can insert any number of fields any number of times into your mail merge document.
8) Click Close when you are done.
Note
The Database selection lists the data source you selected in Step 3. All the information
you need for the letter must be contained in that data source.
22 | Chapter 14 Mail Merge
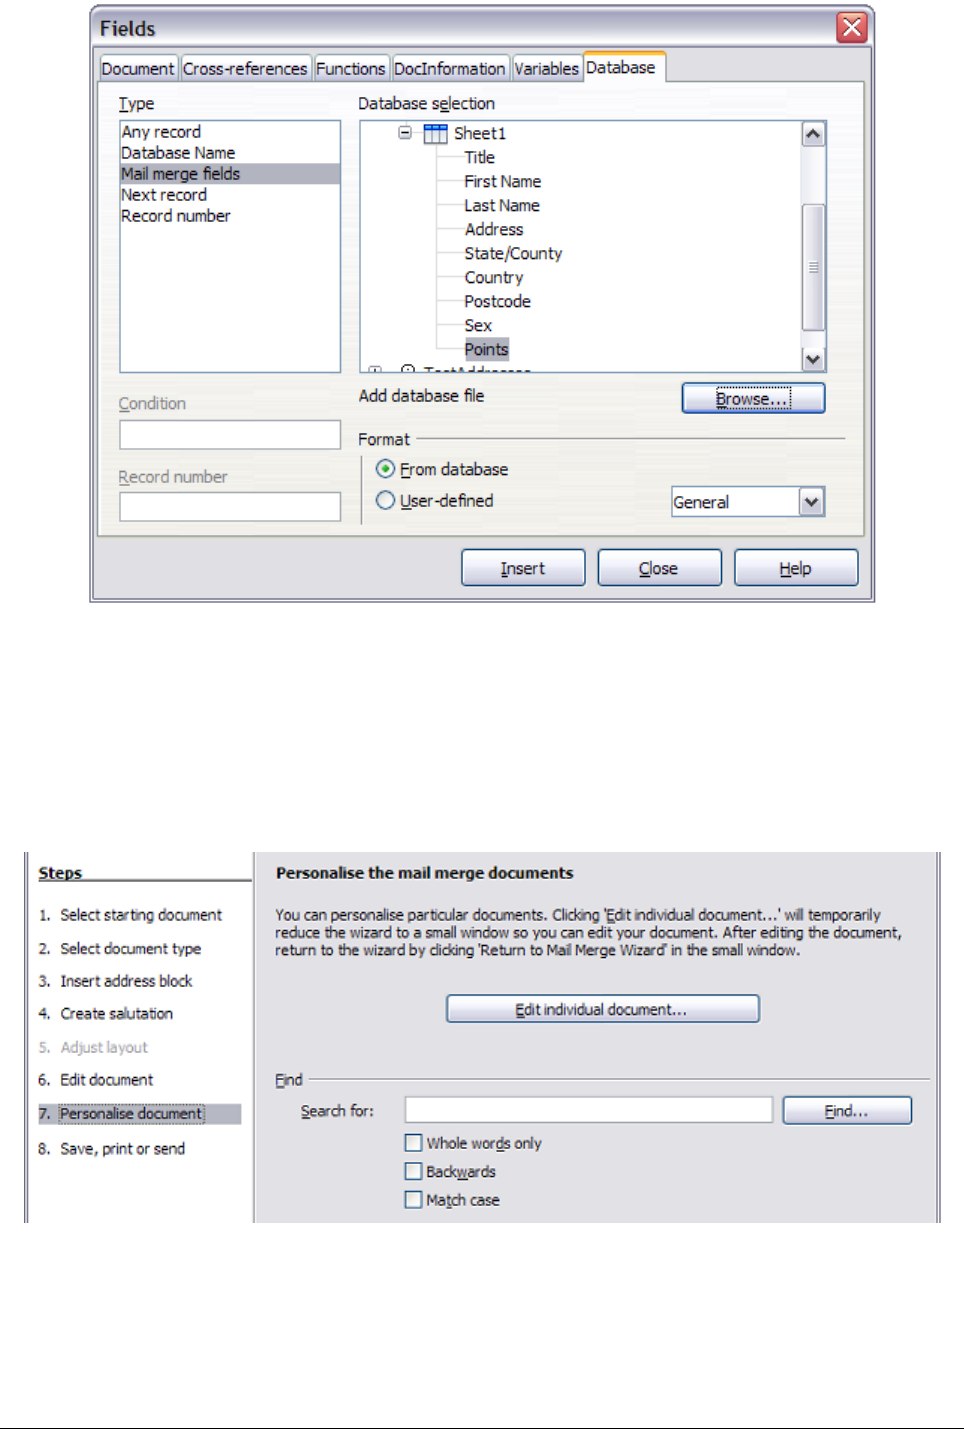
Figure 30: Insert mail merge fields dialog
Step 7: Personalize documents
This step creates all your letters, one per recipient.
Clicking the Edit individual Document button here is similar to step 6. The difference is that you
now edit a long file containing all of the letters, so you can make changes to a particular letter to
one person. In this step of the Mail Merge wizard, click Find to open a dialog that allows searches
within the document, perhaps for an individual addressee.
Figure 31: Personalize document
As with Step 6, when editing the document, the wizard shrinks to a small window (Figure 29). Click
on this window to expand the wizard to its full size.
Using the Mail Merge Wizard to create a form letter | 23

Step 8: Save, print or send
You have now completed the mail merge process. In step 8, you can save the original sample
letter, save the merged document, print the letters right away or, if you created email messages,
send them.
You probably want to save the starting (prototype) document and the merged document. To do this,
select Save starting document to reveal the Save starting document section containing the
Save starting document button. This button will be active only if the document has not already
been saved. Clicking on this button brings up the standard Save as dialog. Once you have named
and saved the document you return to the Step 8 dialog as shown in Figure 33.
Figure 32: Step 8: Save, print or send
The merged document can now be saved by selecting Save merged document. This will reveal the
Save merged document settings section, from which you can select to save either as one large file
containing all the individual, generated letters or as a separate file for each letter.
Figure 33: Saving a merged document
When you have saved the merged document, you can print the final letters now or later; and you
can still manually check and edit the letters if necessary. If you elect to print at this stage, the
dialog shown in Figure 34 appears; it should be self-explanatory.
24 | Chapter 14 Mail Merge
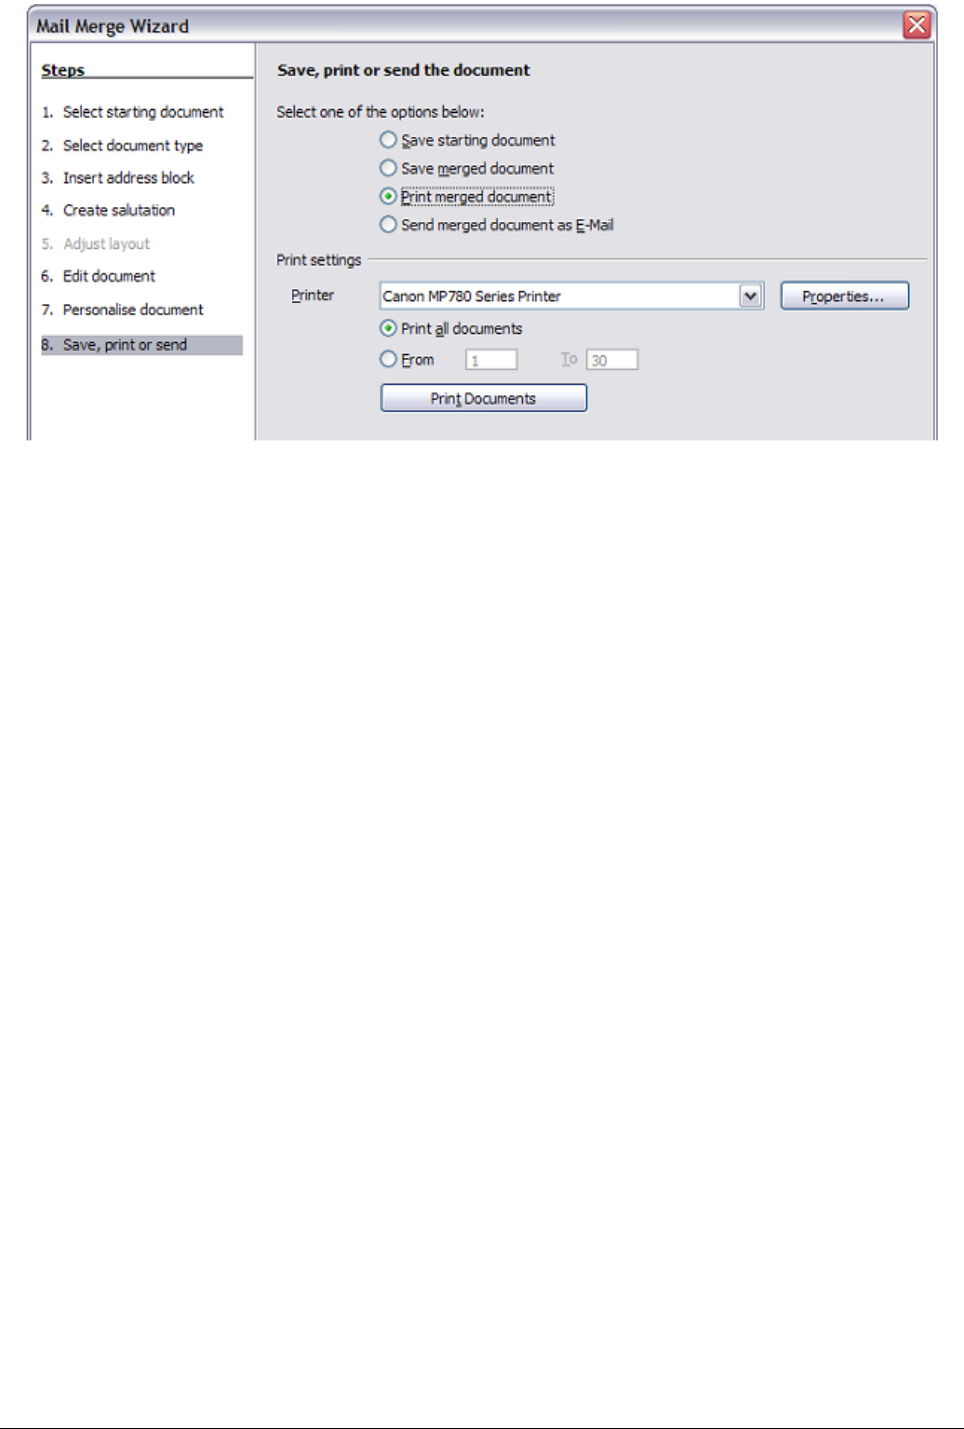
Figure 34: Printing the merged document
Using the Mail Merge Wizard to create a form letter | 25
