Mastering Mail Merge
Southern Methodist University Page 1
Office of Information Technology
2 Parts to a Mail Merge
1. MS Word Document (Letter, Labels, Envelope, Name Badge, etc)
2. Data Source
Excel Spreadsheet
Access Database / query
Other databases (SQL Server / Oracle)
Type in New List
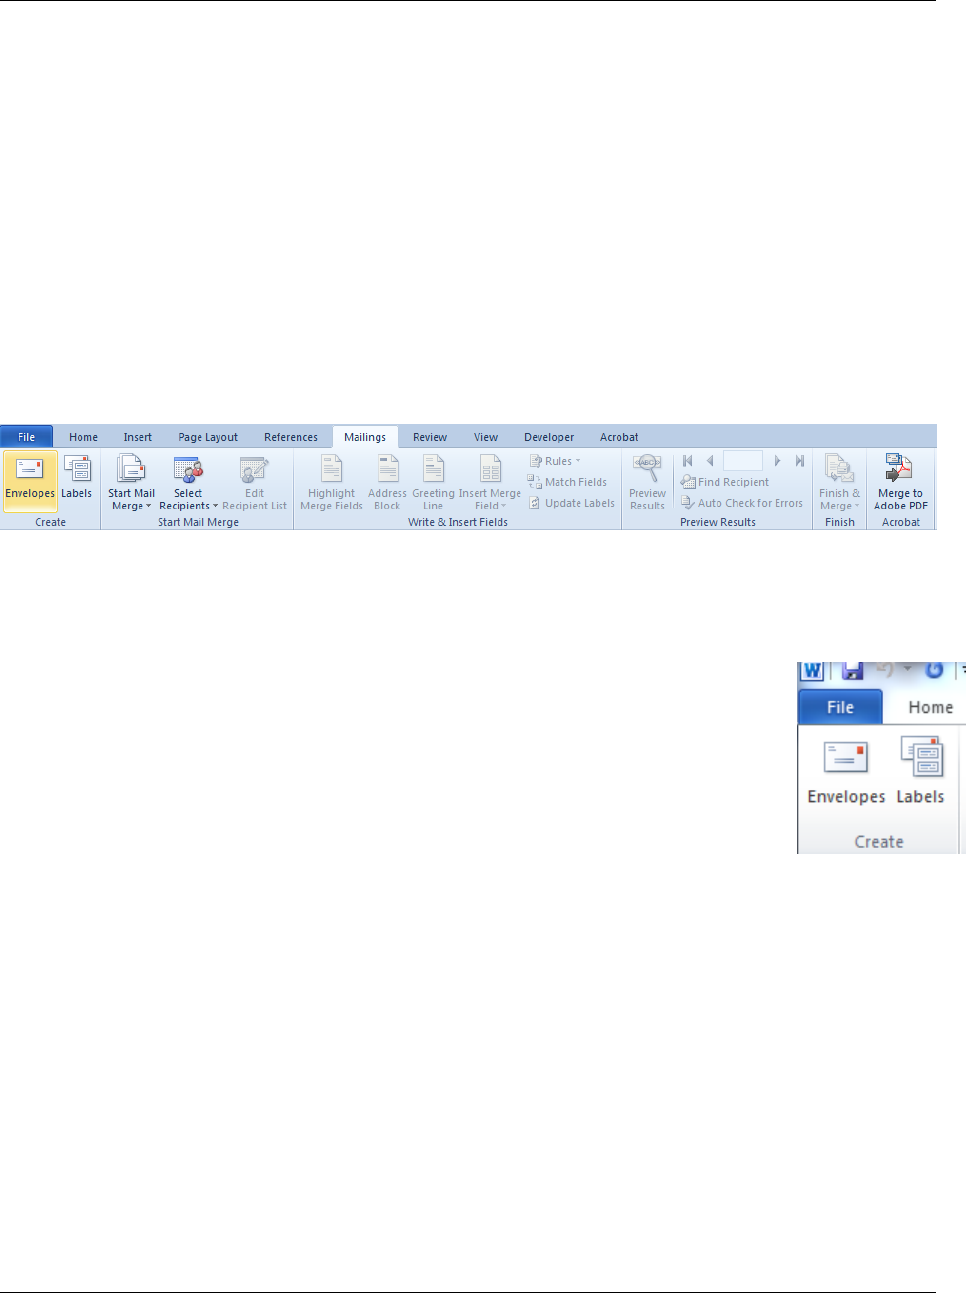
Mail Merge – Mailings Ribbon
Mailings Create Envelopes or Labels
These options are used when you want to create Mailing labels or Envelopes that will
be using the same static content. For example, return envelope in an invitation,
Return Address Labels, etc.
Example: Avery 5667 Return Address Labels.
You can also create Envelopes, choose from the basic envelope setups. This option
will allow you to print a single envelope or multiple envelopes with the same address.
You can save these sorts of documents for repeated use if needed.
Mastering Mail Merge
Southern Methodist University Page 2
Office of Information Technology
Using the Mail Merge Wizard
1. Open up a Blank Document.
2. Mailings Ribbon, Click on Start Mail Merge.
3. Select Step by Step Mail Merge Wizard.
4. Under Select Document, Choose Labels .
5. Click Next: Starting Document .
6. Click on Label Options to locate the layout of the labels you intend to print.
7. Note: You can view Details to verify specifics about
the page layout (or label layout in this case).
8. Click Next: Select Recipients.
9. Choose to use an Existing List, click on Browse to
locate the file and choose to open.
10. If the recipients are in an Excel spreadsheet and there is more than one sheet, you will be asked which
sheet or named range you want to use. Also,
you can identify if the sheet contains column
headers or not.
Here, you can see the Headings in the first row,
you can sort your data, and you can filter your
data.
Mastering Mail Merge
Southern Methodist University Page 3
Office of Information Technology
11. After you click OK, your document will display the first label and subsequent labels as .
12. Click on Next: Arrange your Labels.
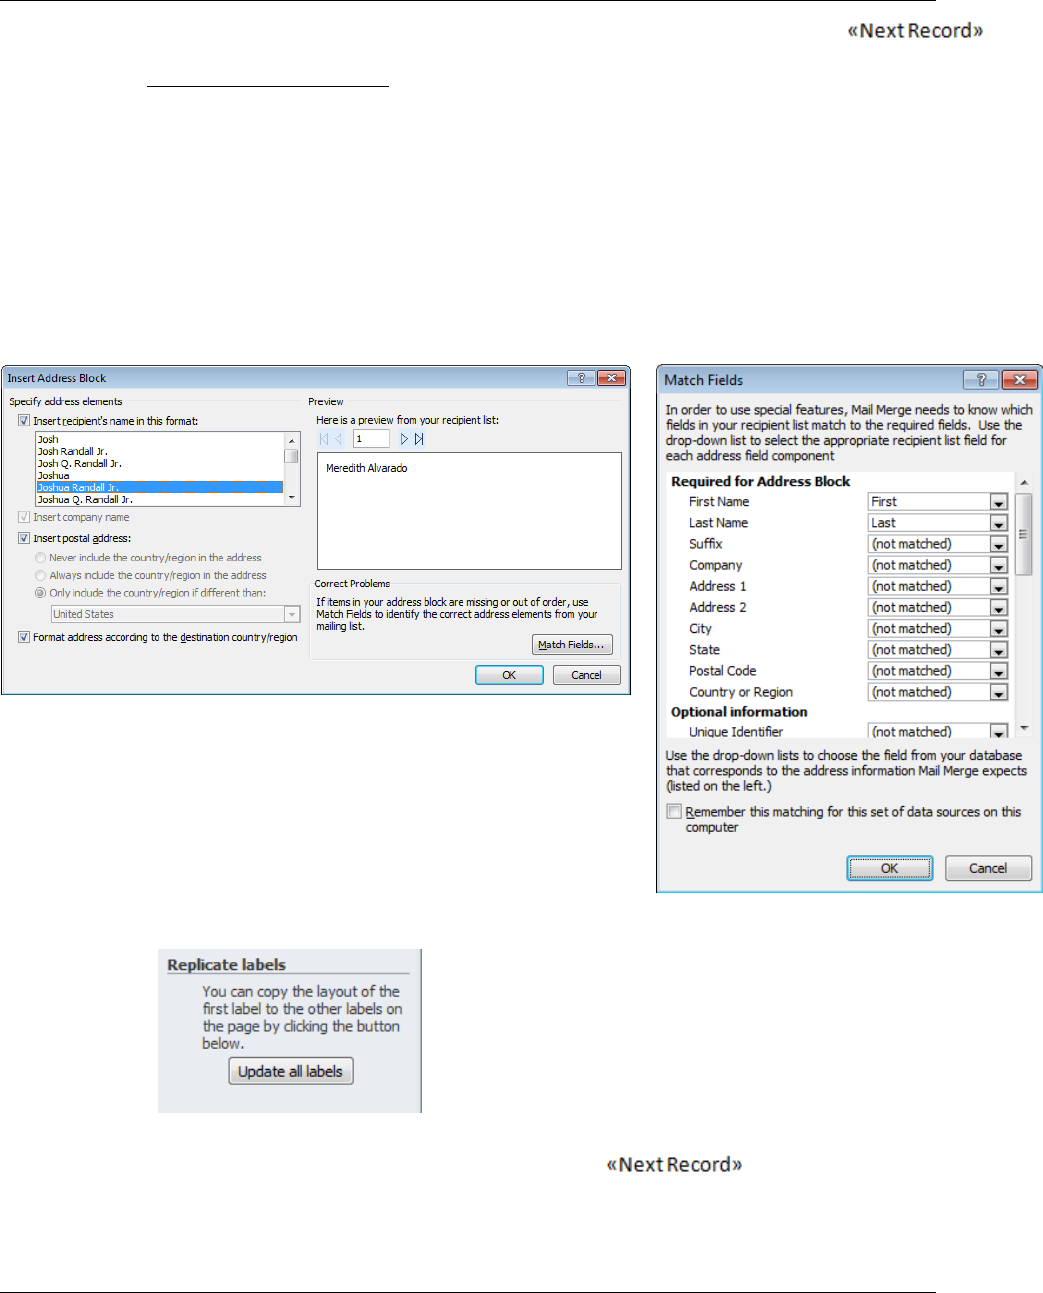
13. Click the first label to format it as you would like. You can use options in the Write and Insert Fields
Group to insert individual Merge Fields and format how they are placed on the label, or use an Address
Block.
Note: Address Blocks will format the address, matching the named fields in your data source to the
common fields included in an address block (ie. First Name, Last Name, Address 1, City, State, Zip etc). If
you sheet’s named fields do not automatically match, you can choose to match the fields up yourself.
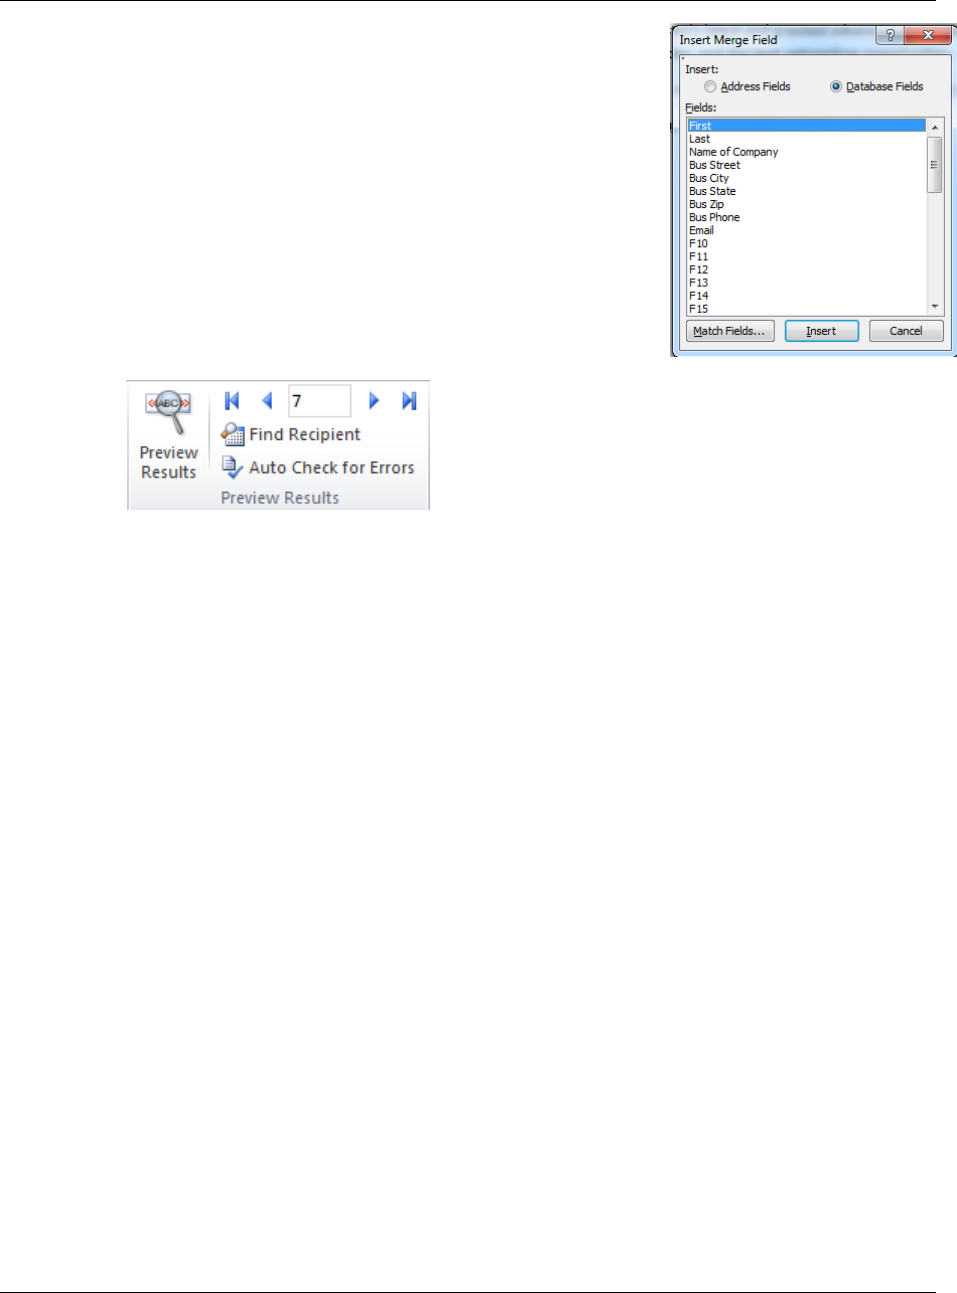
14. You can Preview Results to see what the label will look like,
and click again on Preview Results to toggle off the preview
option.
15. After the first label is formatted as an Address Block, click on
the Update all Labels.
You will now see that each record shows that it is formatted as and an Address Block.

Mastering Mail Merge
Southern Methodist University Page 4
Office of Information Technology
16. Next: Preview your Labels.
At this point, you can see any issues that may arise, especially in formatting.
You can choose the first record and use MS Word formatting from the Home Ribbon
After formatted as you like, go back to the Mailings Ribbon, and click on Update Labels to make sure
any formatting changes are applied to all labels.
17. Next: Complete the Merge and the Labels are placed into a new merged document. You can print
them to a file if you want to save them or you can send them to your printer. Make sure if printing on
to the label sheets, that the labels are in the printer. You also have the option to Edit Individual labels
before printing if needed.
File, save your Labels Document, note that this is the merged document (might want to note that in
the title)
Merging MS Word Letters
1. Open up or Create a MS Word Letter Document.
2. Identify which data in the Letter will be variable.
3. On the Mailings Ribbon / Start Mail Merge Group.
4. Select Recipients
o Type New List – This option is useful if you do not have a stored list of information that you
want to merge into your document.
o Use Existing List – If you have your variable data stored in an excel spreadsheet or database.
o Select from Outlook Contacts – If you are going to use contact data from within outlook.
Requires that outlook is configured on your computer.
Merging with an Existing List
1. Click on Select Recipients, Existing List.
2. Locate the existing excel spreadsheet, MS Access database, etc.
3. Highlight and delete the Name and Address lines in the document and then Click on Address Block to
insert an address block.
Note: if the first line of the address book does not contain headers, you will not be able to use the
Address block or Greeting Line as MS Word will not be able to identify what pieces match the address
or greeting data.
Mastering Mail Merge
Southern Methodist University Page 5
Office of Information Technology
4. Insert Greeting Line and choose the format desired. Note the
format can include the trailing comma.
5. Insert a single Merge Field – choose Insert Merge Field.
6. Edit Recipient List will allow you to reorder, or conditionally
select information from your data source using the filter option.
Use the option to Sort and select the field to sort by.
Use the Filter option to conditionally filter your list.
At this time you can Preview the results by clicking on the preview
results icon in the Preview Results Group of the Mailings Ribbon.
If satisfied with the merged preview, click on Finish and Merge.
This will give you the option to Print Documents, Send E-mail messages or Edit Individual Documents.
If you choose to edit the Individual documents, you will be editing the merged results which will now be
displayed in a separate document window. You can scroll through and edit. After this is complete you can
then print or save this merged document.
If you choose Print Documents from the Finish & Merge icon, you will be presented with Printer Options menu
and can then proceed to print. You will still need to save the document if you want to keep the merged fields
and the connection to the data source.
Merging with a New List
1. Open a new blank Document.
2. Select Start Mail Merge, choose Labels.
3. Choose the label that matches your Name Cards (example Avery 5395).
Choose the Vendor (Avery US Letter)
You can type in the product number
Click on Details to view specifics
4. Select Recipients.
Mastering Mail Merge
Southern Methodist University Page 6
Office of Information Technology
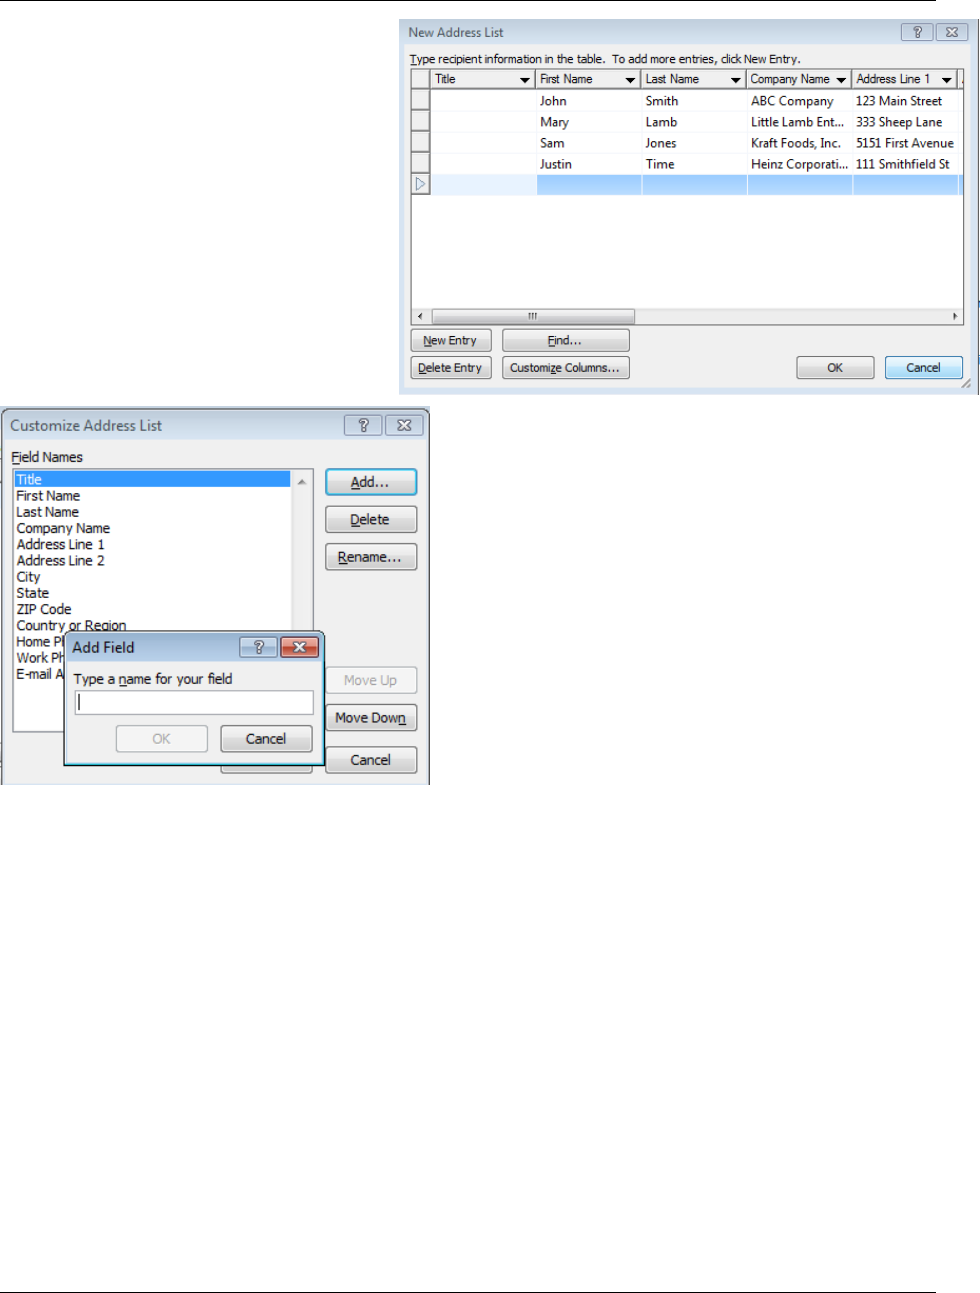
5. Select: Type New List.
The New Address list window
opens with the default columns.
You can begin typing in your
information. Click on New entry
or just type in the first row of the
list.
6. Click on Customize Columns and
you can add your own column of
information and specify where it
resides in the list.
Once finished entering the information in the list, click on OK
and you will be prompted to Save the List. This list will then
be saved as an .mdb file (Access Database file).
7. Select Recipients and open up the saved database
file.
8. Again, there is a single open label at the top of the
document. Here we will build a Name Tag format using the
individual Insert Merge Fields.
9. Once we have the fields in place, we can Update
Labels and notice the remaining labels on the page are
updated.
10. Preview Results to see if the formatting is appropriate. You can modify the formatting for the first
label if needed, then use the Update Labels options to update all labels.
11. Finish and Merge, Print Documents
If you choose Edit Individual Documents, it will open the merged document into another file. This can
be useful if you use the same list of Name Badges (or labels) over and over and want to save the
merged results.
Note: when printing labels, If you choose to print, one page will be the number of records that there are
labels on the page, ie 30. So you can print 1 – 30 and get the first page.
If you decide that you want to filter the merge, you can use the options to filter and enter your filtering
conditions, then preview the results to verify your filter is acting as you expect.
Mastering Mail Merge
Southern Methodist University Page 7
Office of Information Technology
Directory Merge
A Directory Merge used to be called a Catalog Merge in previous versions of MS Word
This option allows you to take information out of a data source and put it a more manageable format.
1. Open / Create a Blank document, Click on the Mailings Ribbon.
2. Start Mail Merge, Choose Directory.
3. Select Recipients, Use existing list – choose excel or a database file that contains your data.
4. Insert Merge Fields.
Note: using a table is an easy way to format the list.
5. Finish & Merge, the list will be displayed.
6. To add a heading, go back to the original document, insert a row above the inserted table, this will
need to be placed into the Header of the document, otherwise this column will be duplicated with
each merged record.
7. Preview Results to check for formatting.
8. Finish and Merge, Edit Individual Documents, Merge all records and Print and/or save.
Merging to Create Email using Contacts
1. Open / Create your email message in Work.
2. Click on Mailings Ribbon, Start Mail Merge.
3. Select Email Messages.
Note the format of the document looks similar to an email now.
4. Click on Select Recipients and choose
Select from Outlook Contacts .
Note: You will need to have outlook configured
on the computer and then MS Word will show
you the available list of contacts from your
outlook profile.
Mastering Mail Merge
Southern Methodist University Page 8
Office of Information Technology
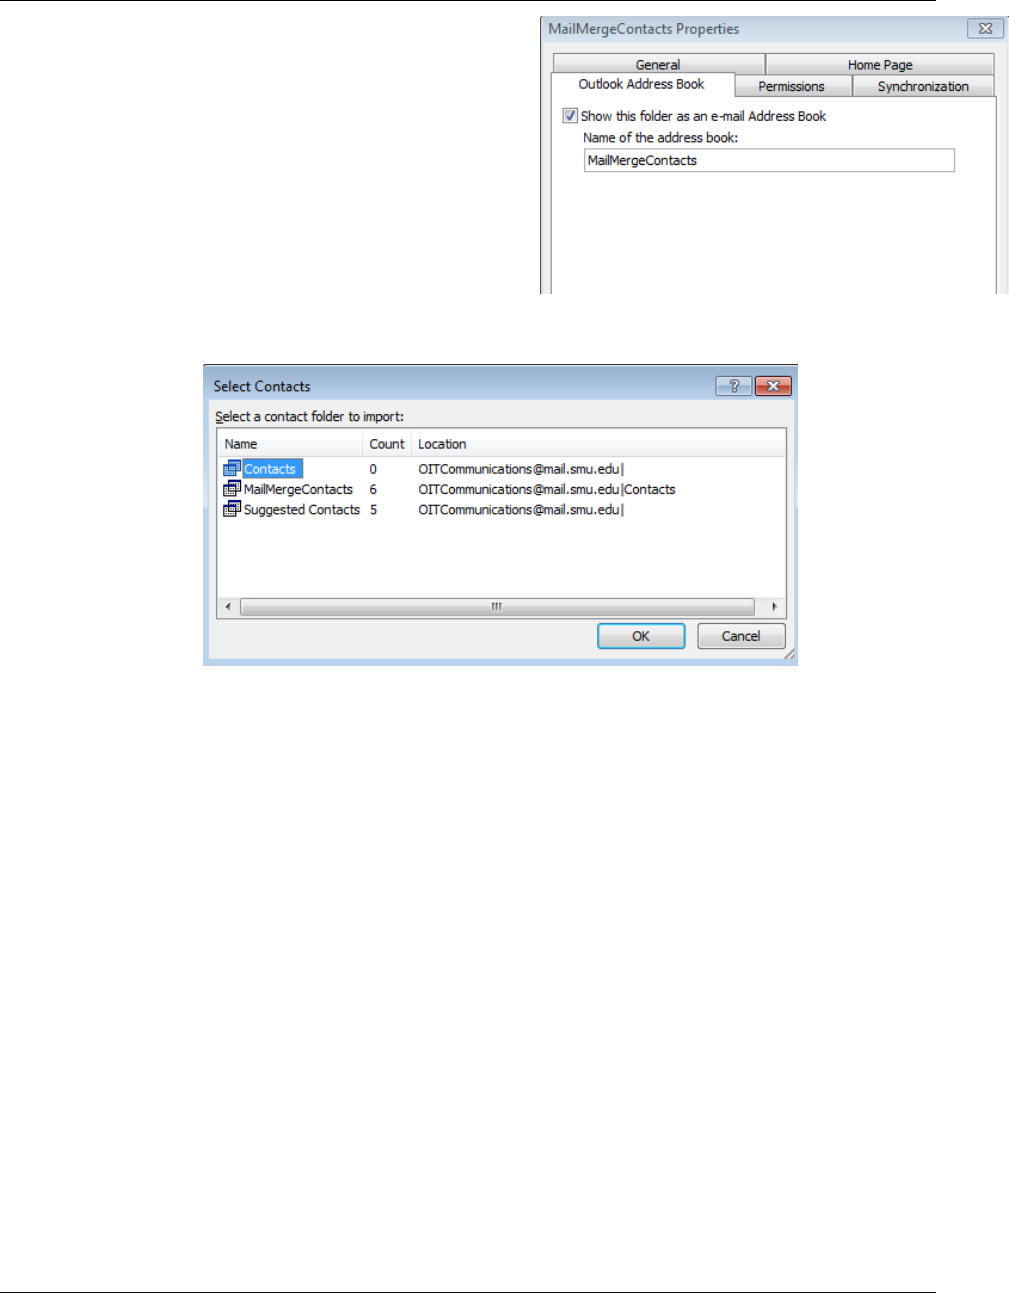
If you have your own contact group that you want to
use in a Mail Merge, it will need to displayed as an
address book. If you do not see your list in the
options for Select Contacts, you need to go back into
Outlook.
a. Go to Contacts
b. Right click on the desired Contact Group
c. Choose Properties
d. On the Outlook Address Book tab, Show this folder
as an Email Address Book needs to be checked.
If you want to send an email from an email address other than your own email, you should have a separate
profile created for that email account, such as a departmental account. You will also need to have your
contacts list available in that alternate profile.
5. In your merge document, choose again Select Recipients, Choose Outlook Contacts and choose the
desired Contact Group.
6. Insert Merge Fields into your document from the Outlook List. Greeting Line, Insert First Name Field
and Company Name.
7. Edit Recipients List and sort or filter your data if desired.
Once you have chosen the outlook contact group you want to include in your merge, you can then
choose specific contacts, sort by any of the headers to order the recipients, you can Filter the
recipients list by clicking on Filter Link, under Fields, you can choose the data field that you want to
filter by.
Important: When merging to Email, if you choose to Finish & Merge, Send Email Messages, the message will
be sent IMMEDIATELY. Make sure your emails are ready and everything is in order.
8. Set your Outlook to Work Offline to test and preview the emails messages. This will hold the messages
in the outbox until you have verified everything is correct.
Mastering Mail Merge
Southern Methodist University Page 9
Office of Information Technology
9. Finish & Merge, Send Email Messages
10. Provide the Subject Line of the Email Message.
11. If you choose to only merge a few, you can check these in the Outlook Outbox. Then after switching
Outlook back Online, you can then go back into your merge document and Merge them all.
Note: May want to break up the emails in batches, if there are several to avoid spam limits
Maybe choose 1 – 50, first, then 51 – 100, etc.
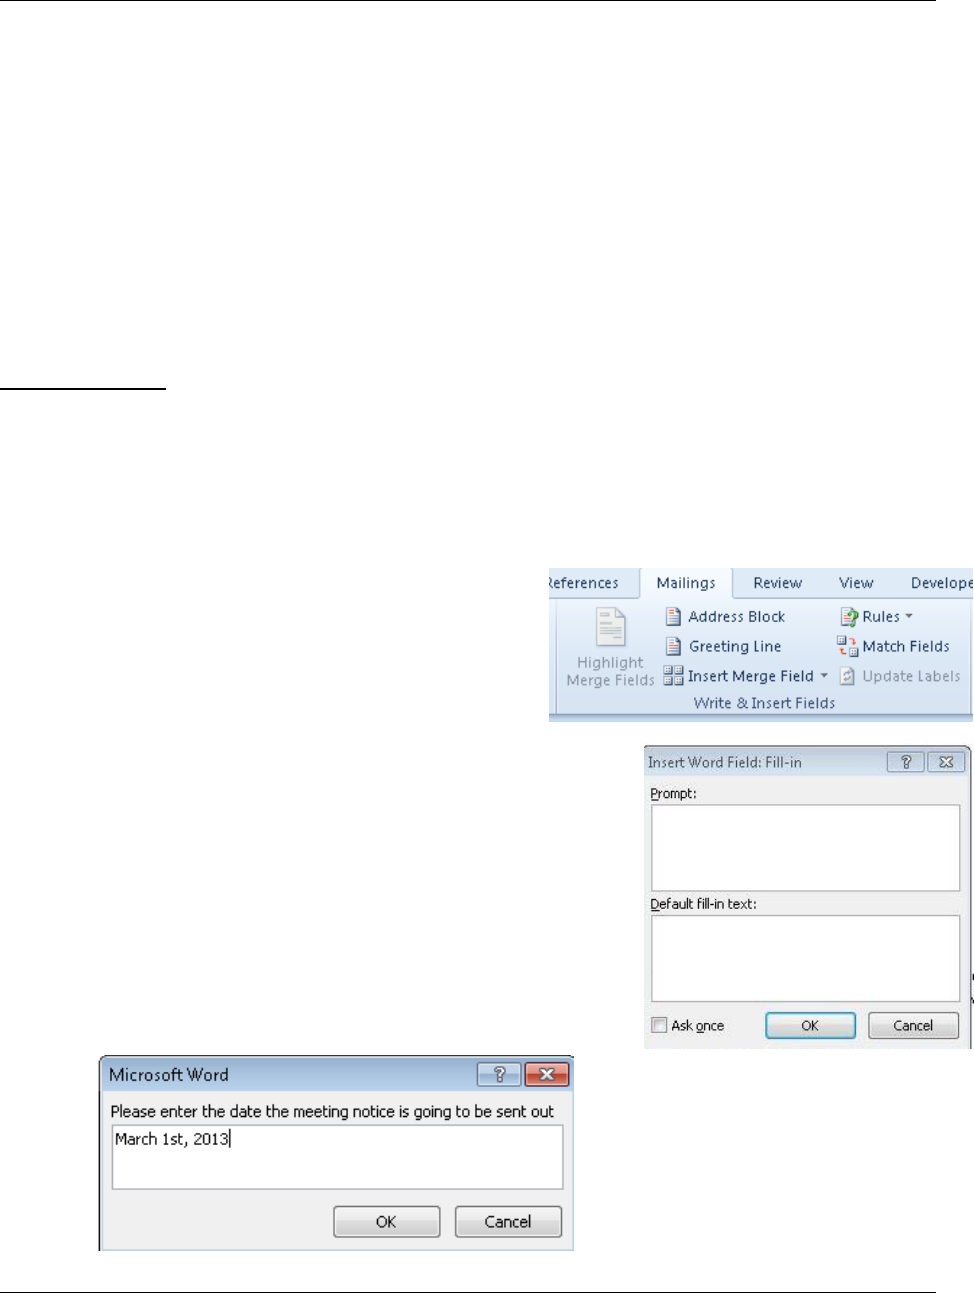
Customized Merging using Rules
Fill-In (Global use)
Fill-In is used to provide a piece(s) of information at the time of the merge.
1. Open / Create a Blank Document.
2. Click on the Mailings ribbon and identify the fields that will be variable.
3. Select Recipients from an existing list.
4. Select Rules from the Write and Insert Fields
Group.
5. Choose Fill-In.
6. Enter the Prompt Text and a default value (if desired).
7. Check the Box Option to Ask Once because this information
will be the same for each letter.
8. Click OK and you will be prompted immediately to Fill-In the
information.
Mastering Mail Merge
Southern Methodist University Page 10
Office of Information Technology
This will be placed in the document. Repeat for any other fields that you want to use Fill-In. Be careful not to
enter any extra fields or enter key after the value, as that will show up in each merged document.
You can Preview Results and Edit Individual Documents, will generate the merged results into another
document. Discard after previewing.
ASK
ASK creates a bookmark to hold the text value temporarily and stores that user entered value in the bookmark.
Then you have to add a corresponding Reference Field and specify which bookmark information to select and
where to place that value in the document.
This is helpful in a case where you may use the same information in the document in more than one place.
Important: The Ask Fields need to occur in the letter before the Reference field associated with that Ask
Field. Good idea to go to the start of the document to insert the Ask Field. CTRL Home will get you to the
top of the document.
1. Click on the Mailings Ribbon, Write and Insert Fields Group
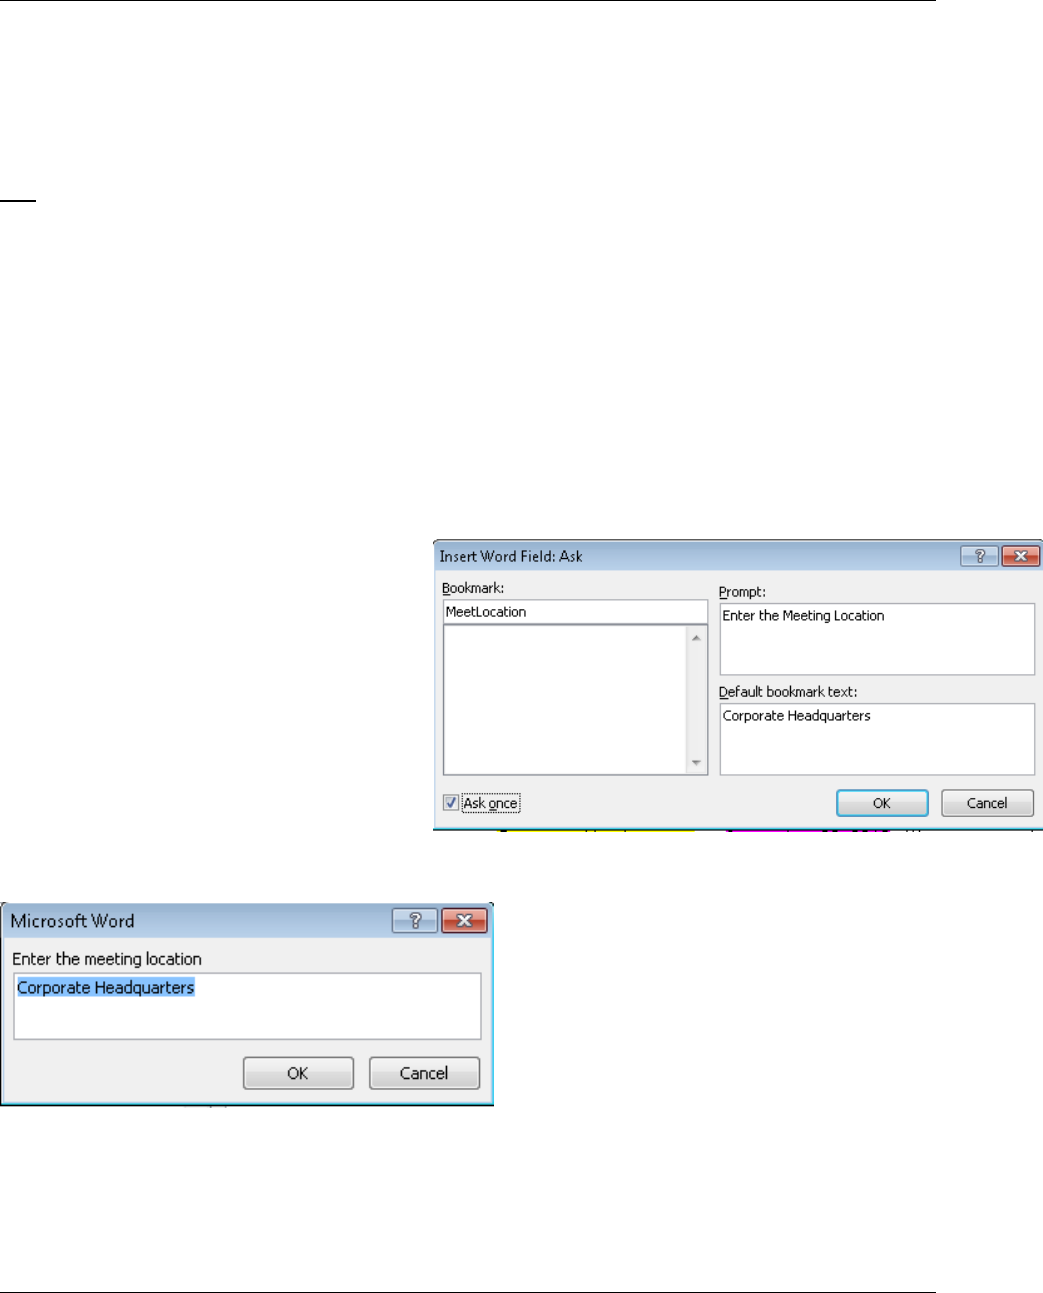
2. Click on Rules and choose ASK
3. Name the Bookmark (You cannot
have a space in the Bookmark Name)
4. Enter the Prompt Text
5. Enter a default value for the
bookmark (if desired)
6. Click on OK and you will be
immediately prompted to provide the information.
Note: At this point, nothing has really happened except that the value has been added into a bookmark
field. We now have to add a Reference Field to that place the bookmark in the letter where we want that
information to be displayed.
Mastering Mail Merge
Southern Methodist University Page 11
Office of Information Technology
7. Click on the specific location in the document where you want to insert the Ask Field (Reference Filed).
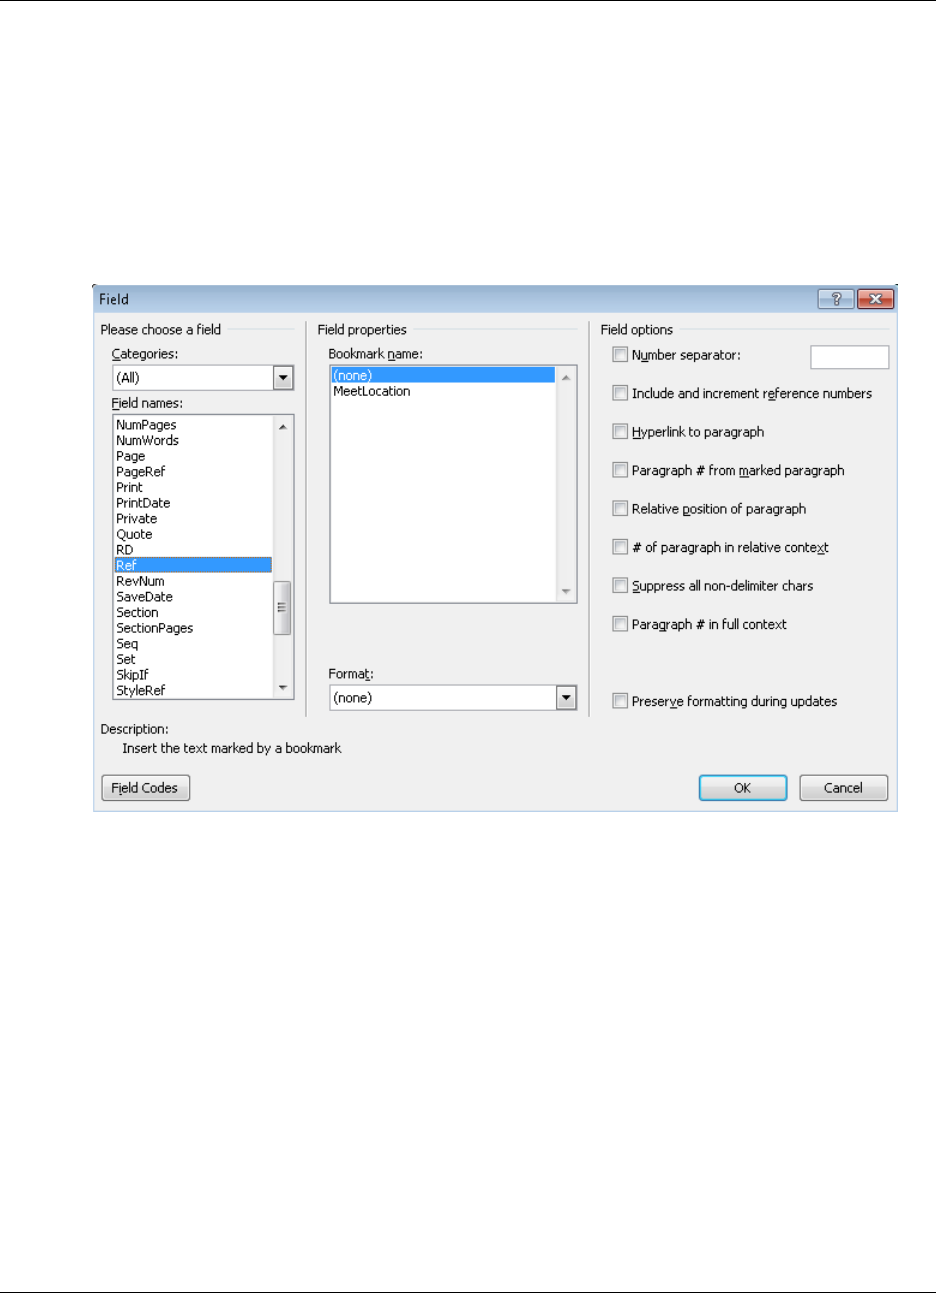
8. Click on the Insert Ribbon.
9. In the Text Group, Click on Quick Parts.
10. Choose Field. This will open a dialog box with options for all types of fields that are available to work
with.
11. Scroll down in the Field Names to locate Ref. The available Bookmarks will be then be displayed.
Locate the bookmark you want. Make sure you are at the right place in the document, because it is going
to insert the reference right where you are. Note options, we are going to use the basic bookmark.
Note: shortcut key Atl F9 you can see all of the fields that have been added into the letter. Atl F9 will
toggle the field codes off and on.
12. Verify how it is working by Finish & Merge, Edit Individual Documents – choose to Merge all.
13. Answer the prompts and make sure the formatting is appropriate.
Note: Good use of Ask might be in a contract, to fill in both parties of a contract.
Mastering Mail Merge
Southern Methodist University Page 12
Office of Information Technology
Fill-In (Individual Use)
This option can provide a different input for each record if we don’t choose the option to Ask Once.
1. In the Merge Document, Click on Rules.
2. Choose Fill-In.
3. Enter the Prompt Text and default value (if desired).
4. Do Not Check the box to Ask Once.
5. Choose to Finish & Merge, Edit Individual Documents.
6. Merge only the first 3 records to test the Fill-In and Ask Field Prompts.
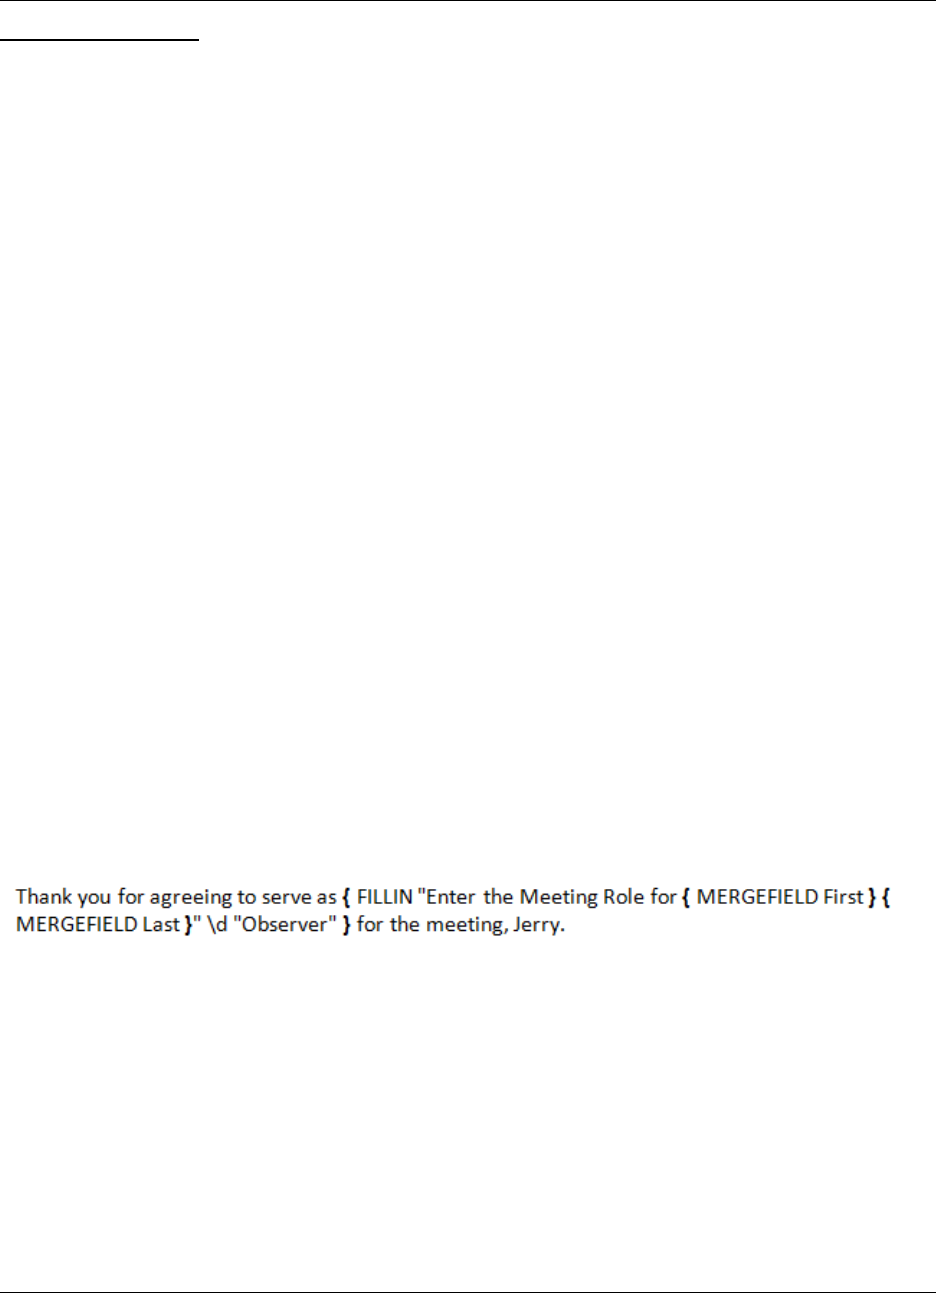
Notice how the Prompt for the Meeting Role we do not know who the person is??
7. Click on Alt F9 to see the field codes. We can modify the Fill-N prompt to identify who the merged
recipient is.
8. Place the cursor inside the Quotes for the prompt.
9. Click on the Insert Merge Field and Select First Name.
10. Press the Spacebar and Click on Insert Merge Field and Select Last Name.
11. Click on Finish & Merge, Edit Individual Documents
12. Select to only merge a few records. Provide the answers for the Prompts and you will now see who
the prompt is for when the Fill-In request asks for the Meeting Role.
Mastering Mail Merge
Southern Methodist University Page 13
Office of Information Technology
Merge using IF fields
Use IF Fields for conditional responses. You can examine the data to determine and conditionally modify the
content of the letter. IF the condition is met, display one result, otherwise display another.
1. In your document, set the cursor where you want to place the conditional information.
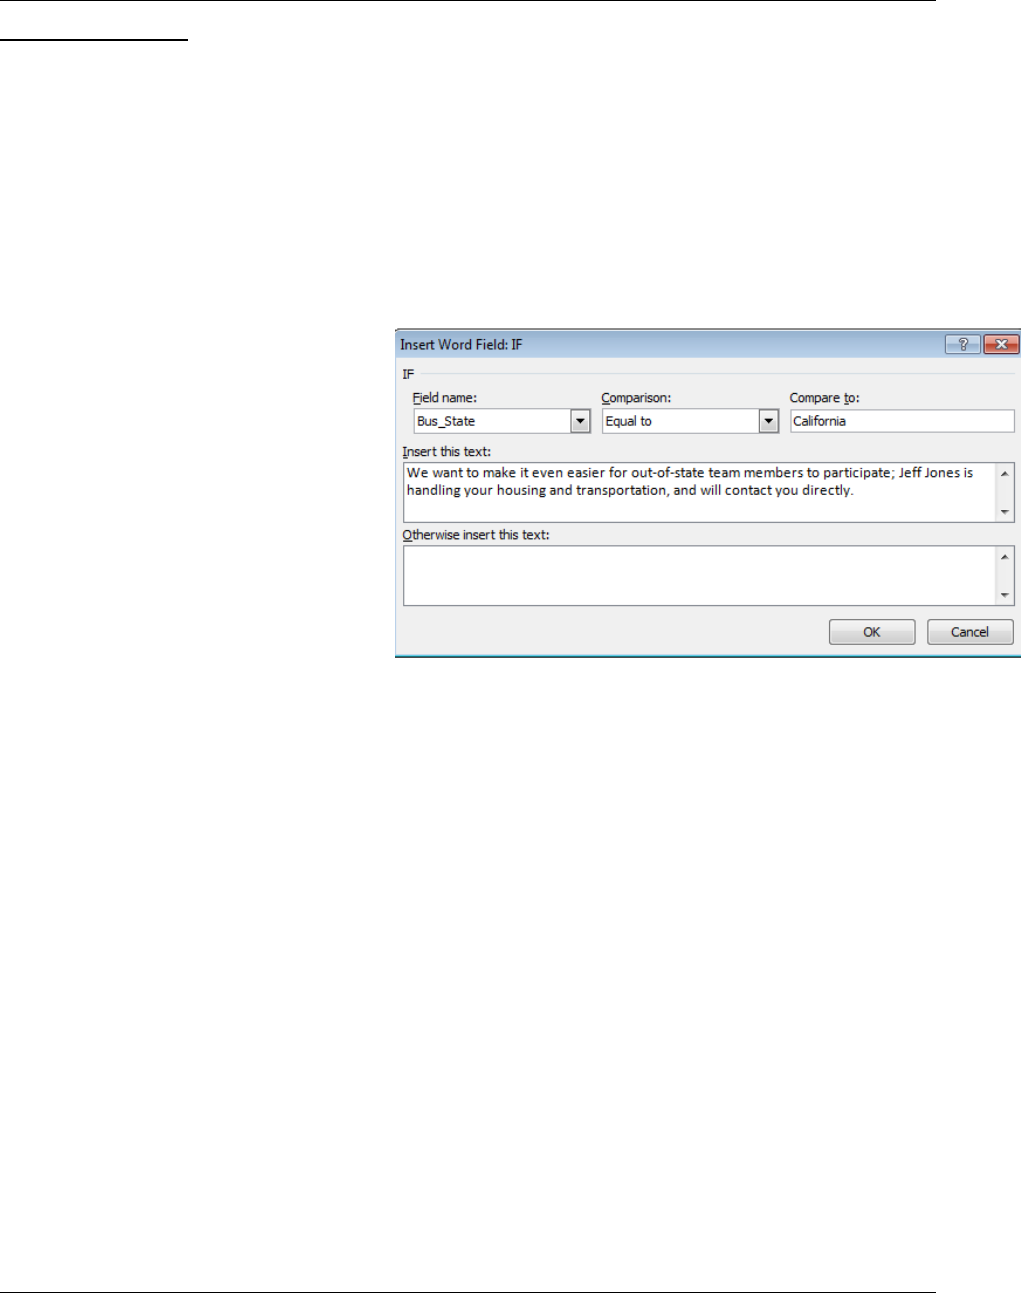
2. Go to Mailings Ribbon and click on Rules.
3. Choose If.. Then.. Else.
4. Enter the conditional information.
Click OK.
5. Press Alt F9 to see the field codes
and conditional information.
6. You can select and format the
conditional text to make sure it is
formatted as you desire from the
Home Ribbon.
7. Finish & Merge, Edit Individual
documents.
8. Only merge the first few records to verify how things work. Once everything works like you want it to,
close out of the merged document, go back to the working document and complete the final Finish &
Merge, Edit Individual Documents and merge all records.
You can use IF multiple times within a document.
